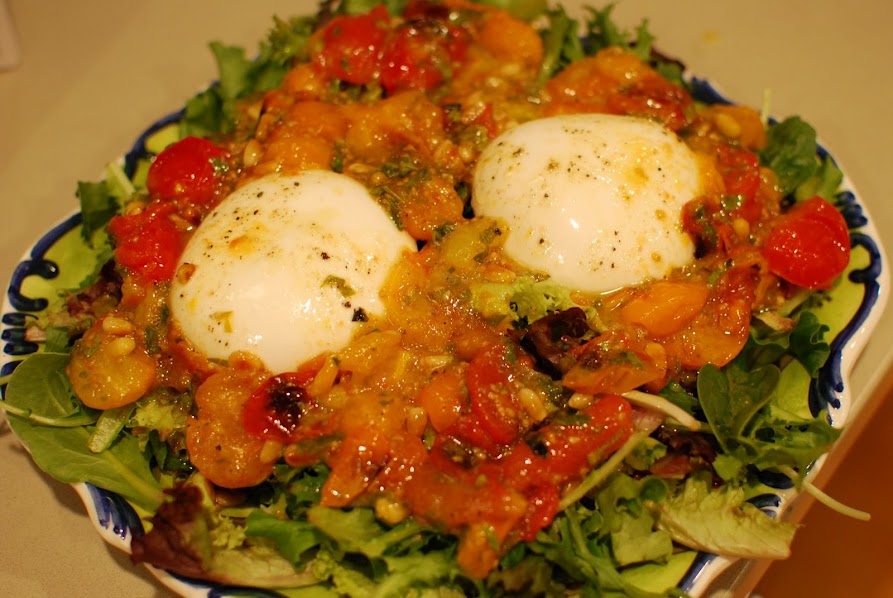
made by Emily Caprese salad is one I make all the time in the summer months once we start getting good Jersey tomatoes. Burrata cheese is a fresh Italian cheese that is made of mozzarella and cream. It is very similar to fresh mozzarella but the center is creamy. Along with roasted tomatoes, burrata cheese adds a nice twist to caprese salad.
You'll Need:
For salad:
3/4 lb mixed yellow and red cherry tomatoes, or just use regular fresh garden tomatoes
2 Tbs olive oil
salt & pepper
1 pkg baby romaine or mixed greens, enough for 4 small salads
1 lb fresh burrata cheese at room temp (leave out of fridge for about 30 min prior to making salad)
10 fresh basil leaves, julienned (sliced into thin strips)
For dressing:
1/8 tsp dry mustard
salt & fresh ground pepper
1/4 cup olive oil
2 tsp fresh squeezed lemon juice
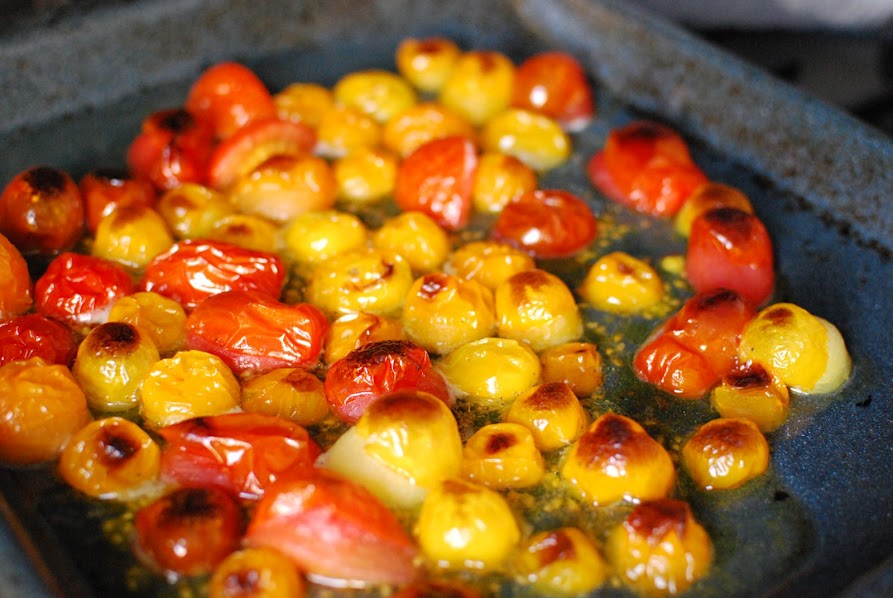
Half the tomatoes and toss with olive oil, salt and pepper. Roast in a shallow baking pan under broiler for a few minutes until skins just start to get browned.
Remove from oven and let cool while you prepare dressing.
Whisk together dressing ingredients and set aside.
Arrange salad greens on a serving plate, top with burrata cheese and the tomatoes (which should be about room temperature by now). Sprinkle the julienned basil on top of the cheese and tomatoes. Then drizzle the dressing over all and serve immediately. If making ahead, add dressing right before serving.
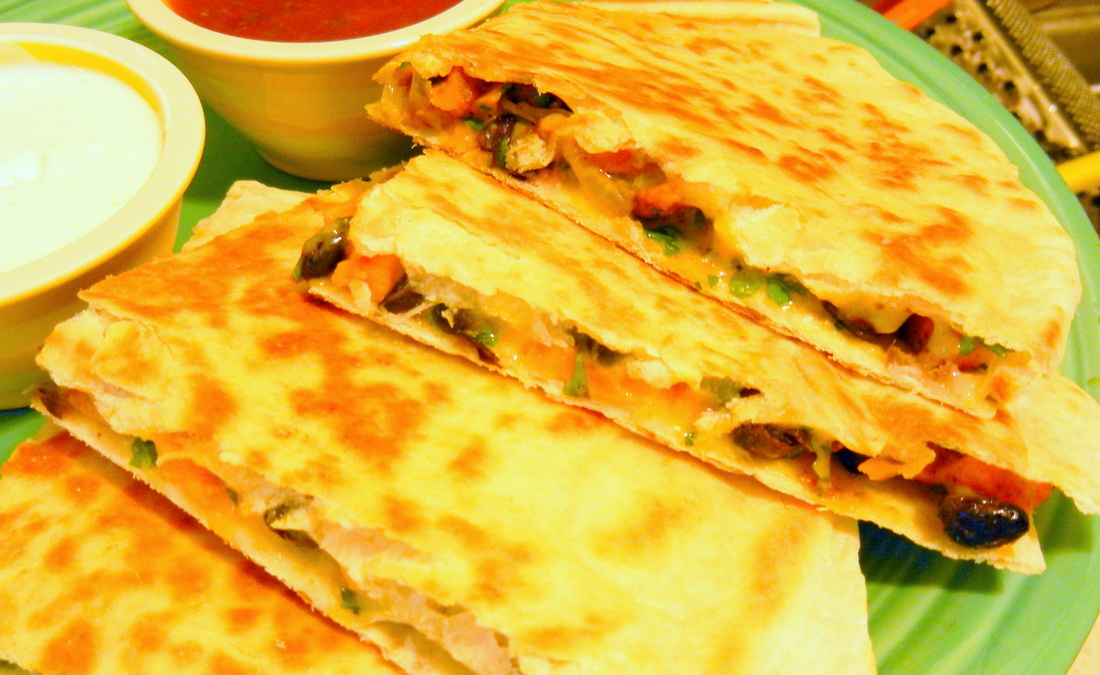
made by Rachel My girl friends and I had an absolutely awesome dinner at this place in Saugatuck, Michigan called Phil's...nothing fancy about the name or the look of the place, but the food was really amazing. My favorite part of our dinner was a black bean quesadilla (which was our first course, followed by some incredible fish tacos!). Here is my not-too-shabby attempt at making something just as tasty at home. For the quesadilla:
Flour or corn tortillas (I used flour)
1 15-oz can black beans, rinsed, drained
2 cloves garlic, minced/pressed
1 lime, juiced
2 cups sweet potatoes, cubed
1/2 cup chopped onions
1/4 cup chopped jalapenos (optional)
1/2 teaspoon ground cumin
1 teaspoon chili powder
S & Pepper
2 Tbs olive oil
2 tablespoons chopped fresh cilantro
Shredded cheese (jack, colby, chedder, whichever you prefer - I used a combo of jack and sharp cheddar)
Butter or oil for grilling
Optional garnish:
Sour cream
Cilantro
Salsa
To make:
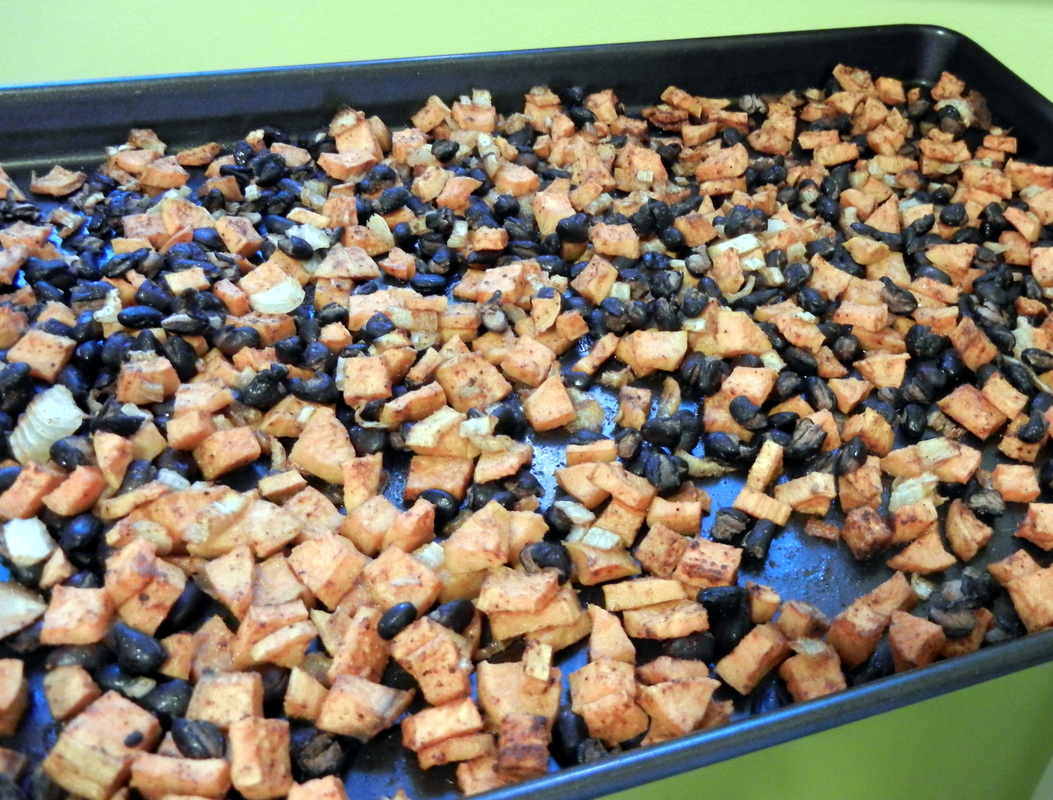
Pre-heat your oven to 350F. Mix together the black beans, garlic, lime juice, sweet potatoes, onions, and jalapenos (if using) along with the cumin, chili powder and a sprinkle of salt and pepper. Toss in a bowl with the olive oil and then spread along a baking pan in an even layer. Cook, mixing and tossing every once in a while for about 20 minutes or until the sweet potatoes are tender (stick with a fork and taste).
Heat up a pan or skillet for making your dillas. Melt butter or spread a thin layer of oil on the pan. Arrange your quesadilla by layering a tortilla, black bean/potato mix, a sprinkle of cilantro, and finally layer of shredded cheese. Top with another tortilla and cooked on both sides until lightly browned and perfectly crispy. You might need two spatulas to turn these puppies over if you use big tortillas like I did!
Use a knife or pizza cutter to slice into wedges and serve with sour cream, salsa, and a sprinkle of fresh cilantro. Step aside Phil...these are darn good!
WOW. I cannot believe it's been a year since we first started posted our recipes! I mean can you believe it? I can hardly believe it (say that like an old man from Long Island and then tell me what movie that line is from!).
For our 1st anniversary we thought it would be fun to have a virtual progressive dinner at each of our houses, since we wish we could actually do that in real life! So we are going to start with drinks and apps at my house in Michigan (Rachel), then move to dinner at Emily's in New Jersey, and finally finish the night with dessert with Mandy in New Hampshire. We hope you enjoy having dinner with us! Come on over for cocktails at my house...Refreshing Watermelon Margaritas! For these fresh and sweet treats you will need:
1/3 cup fresh squeezed orange juice
1/3 cup fresh squeezed lime juice
3 Tbs granulated sugar (plus more for sugaring the rims of your glasses)
3 cups of cubed watermelon (I like to freeze the watermelon first so your drink is automatically cold when you blend it!)
1/3 cup water
1/3 cup tequila
Club Soda (enough to fill each glass 1/3 of the way)
Strawberries and limes for garnish
Run a lime wedge around the edge or your glass and then dip into a plate or bowl of sugar to sugar the rim. Cut a strawberry and a lime and garnish on the edge of your glass.
Put all ingredients EXCEPT CLUB SODA into the blender. If your watermelon is not frozen, add a couple ice cubes and leave out the water. Blend until creamy.
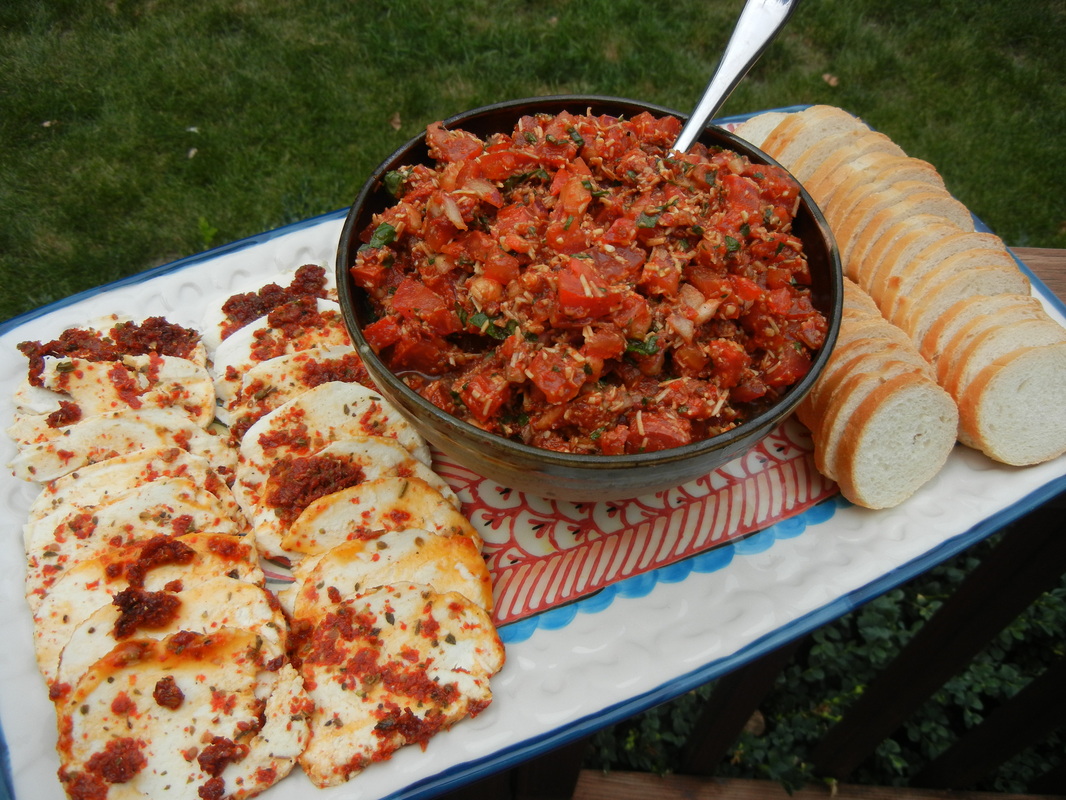
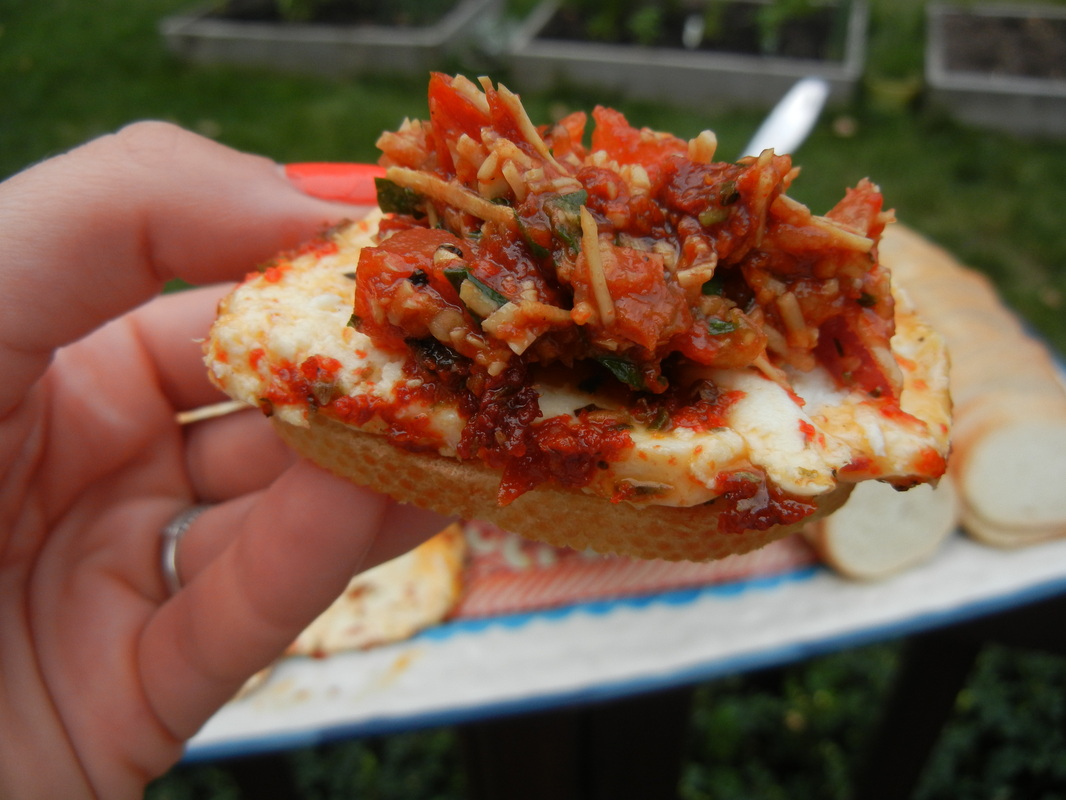
Fill your glass 1/3 of the way full with club soda, then top off with your blended mix. Give a little stir and enjoy! And then some appetizers...Sun-Dried Tomato Bruschetta! This bruschetta is so delicious...I served it with thinly sliced french bread (I know, I should have used Italian since it's Italian food - but French is smaller and more sturdy!). I also served marinated fresh slices of mozzarella cheese (marinated in olive oil, basil, oregano and S&P). For the bruschetta you will need:
6-8 roma tomatoes, chopped
1/2 cup sun-dried tomatoes, packed in oil, chopped small (I did this in my food processor)
3 cloves garlic, minced or pressed
1/4 cup extra virgin olive oil
2 Tbs balsamic vinegar
1 cup loosely packed fresh basil, chopped
1/2 tsp salt (or to taste)
1/2 tsp fresh cracked pepper (or to taste)
1/2-1 cup fresh parmesan, shredded
1/2 red onion, diced (about 1/2 cup)
1 lemon wedge
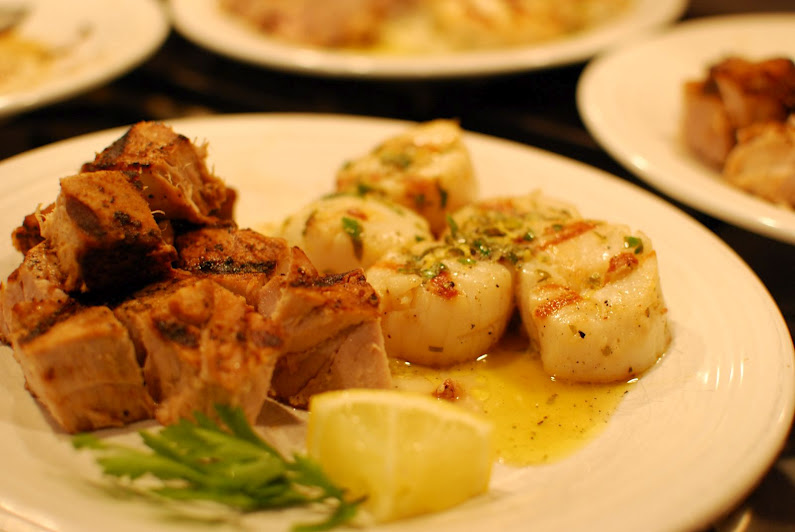
1 French baguette, cut in 1/2 inch slices The prep is super easy - just chop it all up nice and tidy and then squeeze the juice from the lemon wedge over the top (just a spritz otherwise it will taste lemony!) and then serve with the baguette slices. Thanks for coming over to my house!! Next stop...Emily's for Grilled Scallops & Tuna Bites For the scallops you will need:
20 jumbo scallops or about 40 regular sized
2 cloves of garlic, minced
1/2 tsp grated lemon zest
1/4 cup fresh lemon juice
1/4 cup extra virgin olive oil
2 tsp minced fresh oregano
1 tsp minced fresh flat leaf parsley
sea salt and fresh ground pepper
Using a paper towel, brush a little olive oil on the grill grates so the fish doesn't stick when grilling. Preheat grill to high.
Rinse and pat dry scallops with a paper towel. In a small bowl, combine garlic with lemon zest and juice. Add 1/4 cup olive oil and whisk for 1 minute. Stir in oregano. Set this aside to spoon atop grilled scallops.
Brush scallops on both sides with olive oil and season with salt and pepper. Grill about 2 minutes on each side. Arrange on serving platter and spoon sauce on top, then top with fresh parsley garnish.
For the tuna you will need:
1 1/2 - 2 lbs fresh sushi-grade tuna
1 Tbs fresh ground pepper (this is important for a really peppery taste)
1 Tbs sea salt
1 tsp paprika
1/2 cup extra virgin olive oil
1 lemon cut into small pcs to serve with tuna
Same as for scallops; using a paper towel, brush a little olive oil on the grill grates so the fish doesn't stick when grilling. Preheat grill to high.
Grind your fresh pepper (you can grind whole peppercorns in a coffee grinder or mini cuisenart, or just use a table pepper grinder and try to measure out a Tablespoon before your arm falls off).
In a bowl, combine ground pepper, salt and paprika. Rinse and pat dry tuna with paper towels. Cut tuna into long thick strips, 1 or 1 1/2" thick. Roll each pc in the pepper mixture and set on a plate. Drizzle tuna with 1/4 cup of the olive oil and grill tuna about 1 minute on each of the 4 sides - just until seared. (see below ***) Set on a plate for a few minutes before checking. Then cut tuna into equal sized cubes. Drizzle with remaining olive oil and serve with lemon wedges.
***4 minutes of total grill time should give you medium rare tuna, but cook to your liking. Mine is cooked through in the pics but ideally you want pink centers.
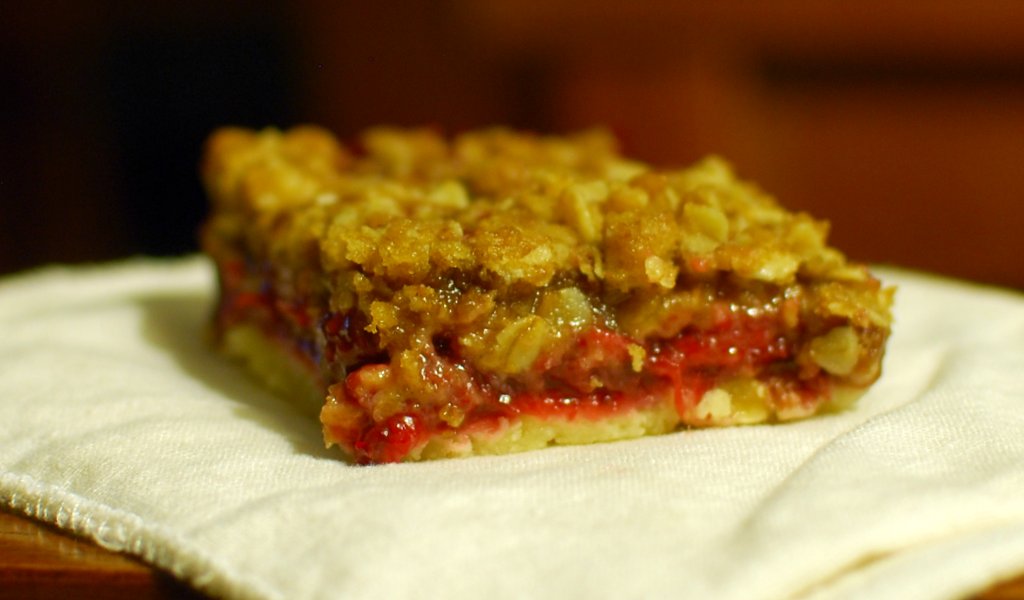
Now don't eat too much, otherwise you will fall asleep on the ride to Mandy's house like they little cuties... Last stop...Miranda's for Strawberry Rhubarb Crumble Bars! Our dad is a huge fan of strawberry rhubarb anything. A few years ago I wanted to make him a delicious dessert but couldnt find a recipe anywhere for what i was picturing, so I came up with this. I make it multiple times every summer now and have even made it with different fruit combinations.
For the shortbread crust you will need:
1/2 cup butter (1 stick) room temp.
1/4 cup confectioners sugar
1 cup flour
For the fruit middle you will need:
1 1/2 cup rhubarb stalks chopped into 1/2 inch chunks
1 1/2 cup chopped strawberries
1 Tbsp lemon juice
1/2 cup sugar
2 Tbsp cornstarch
For the crumb topping you will need:
1 cup flour
1 cup oats
2/3 cup brown sugar
1/2 cup butter, melted
1/4 tsp baking soda
Directions:
Preheat oven to 350. Grease 8x8 inch baking pan (or a pie plate works). Combine crust butter and conf. sugar in mixer until smooth. Add crust flour until JUST BARELY combined- overmixing it makes it difficult to spread in pan. Mixture should still look pretty floury. Press dough evenly into bottom of pan and bake for 20 minutes or until lightly browned.
Meanwhile, heat rhubarb and strawberries in saucepan over medium heat, mashing and stirring it so it gets juicy and doesnt burn on bottom, until tender and juicy. Stir in the 1/2 cup sugar. Whisk cornstarch and lemon juice together until smooth and then add to the fruit and boil 1 minute until it thickens slightly. Set aside.
Mix all topping ingredients except butter in a bowl. Then pour melted butter over that and toss with a fork until combined and crumbly. When shortbread bottom is done, pour fruit over bottom crust. Pour crumbly topping evenly over fruit. Bake in oven for approx 25-30 minutes more or until topping is slightly browned and fruit is bubbling. Cool completely before cutting into squares. You may make a drizzle for the top with 1/2 cup conf. sugar mixed with 1-2 Tbsp milk if you want (makes a glaze icing).
We really hope you have enjoyed our progressive dinner as much as Remy (above) is enjoying her berry crumble! It's been a really fun and busy year of creating and cooking and sharing...thanks for visiting and trying our concoction out!
And a special thanks to my sisters Emily and Mandy for doing this with me - I love you both so much and have had so much fun! I cannot WAIT to see you both next week!
That reminds me, next week is our family reunion at our parents cabin, so even though we probably won't be posting anything new while we are there, we will be sure to come back with some pictures and new recipes to share after!
Enjoy your day, week or however long it is until we post again! CIAO!
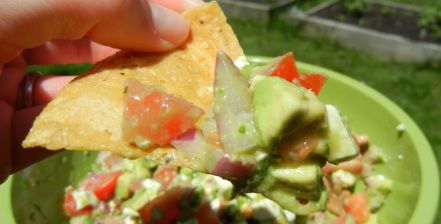
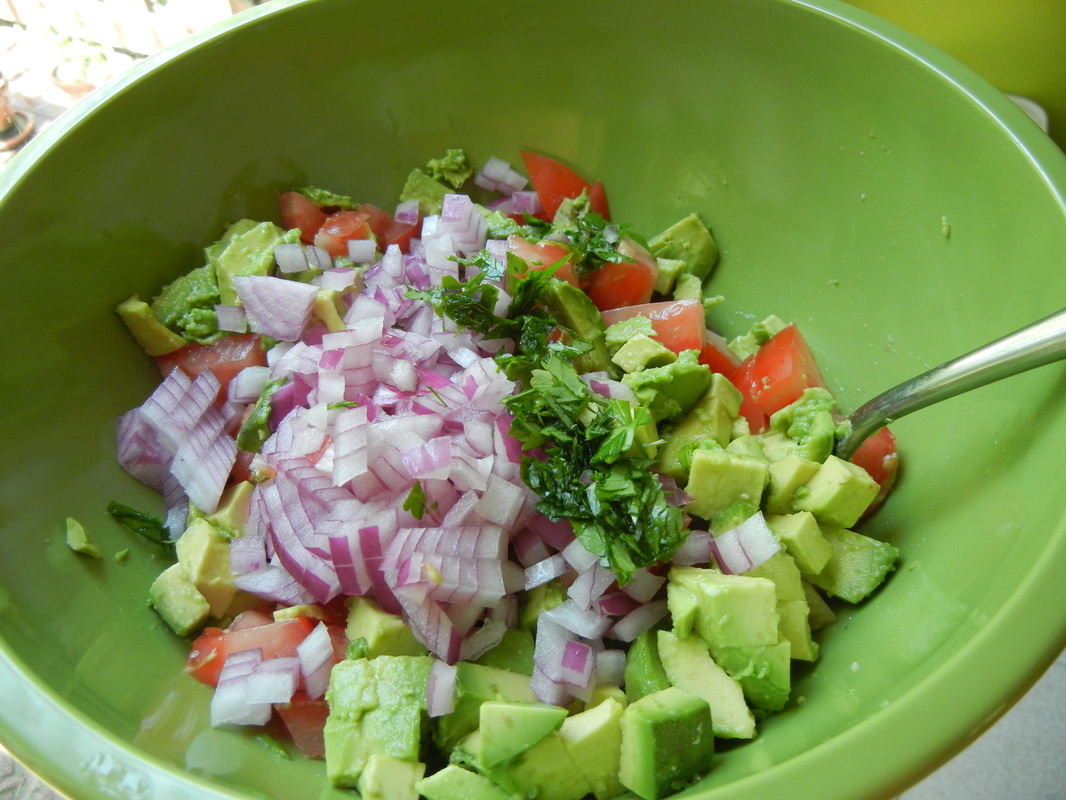
made by Rachel I absolutely love guacamole - good old fashioned guac with avocado, lime, red onion, and jalapenos. But my whole avocado loving world changed when my friend brought over guacamole with FETA cheese in it. Not normal, I know, but please trust me on this and try it out. This "guacamole" recipe is so good you will probably want to eat the whole bowl yourself...oh wait, that's what my husband did with the bowl Kim brought over! Ok, ok fine that also what I did when I made my own version the next day! Point being, it's awesome.
This is what I came up with when I tried to re-invent Kim's awesome guac...
You will need:
2 large tomatoes, chopped
2-3 ripe avocados - chopped
1/4 cup red onion, diced
1 large clove garlic, minced/pressed
1 Tbs parsley, chopped
1 Tbs olive oil
1 Tbs red wine vinegar
1/2 cup feta cheese, chopped (I prefer to use the block of feta and cut it up yourself so you can control how large the chunks are)
S&P to taste
To Make:
Now here is the complicated part...but if I can do it, you can do it! In a bowl, combine everything but the feta and toss. Tough stuff, I know, I will try for something a little more challenging next time.
The avocado will break apart a bit but I think leaving it chunkier is better (as opposed to smooth creamy like in traditional guac). Chop feta and add to bowl and toss.
Serve with tortilla chips and be careful to not eat the whole bowl before your guests arrive (or just make a double batch so you can eat as much as you want).
And thanks Kim for the great idea! Feta really does make everything BETTA!
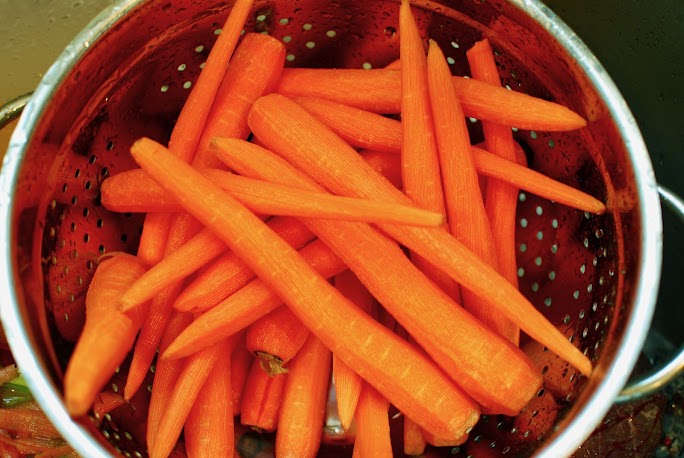
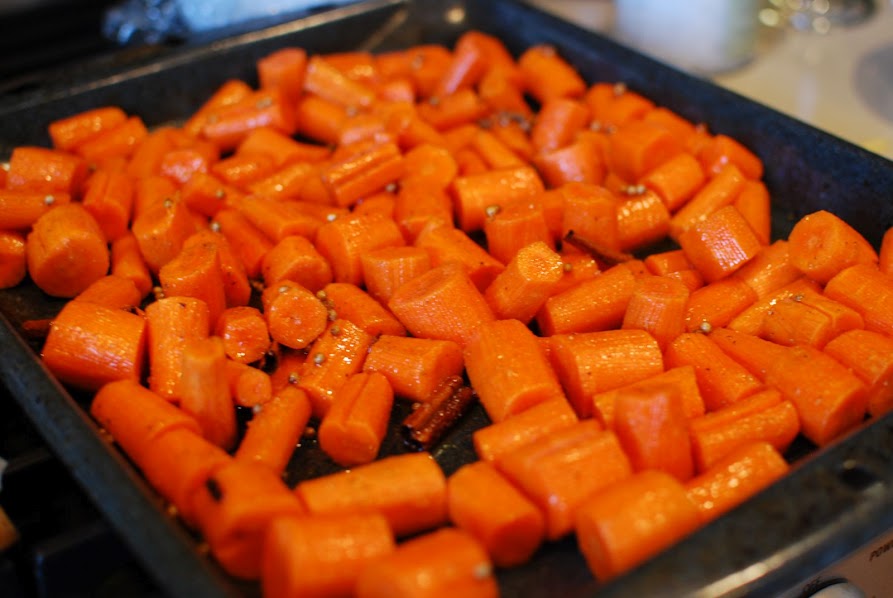
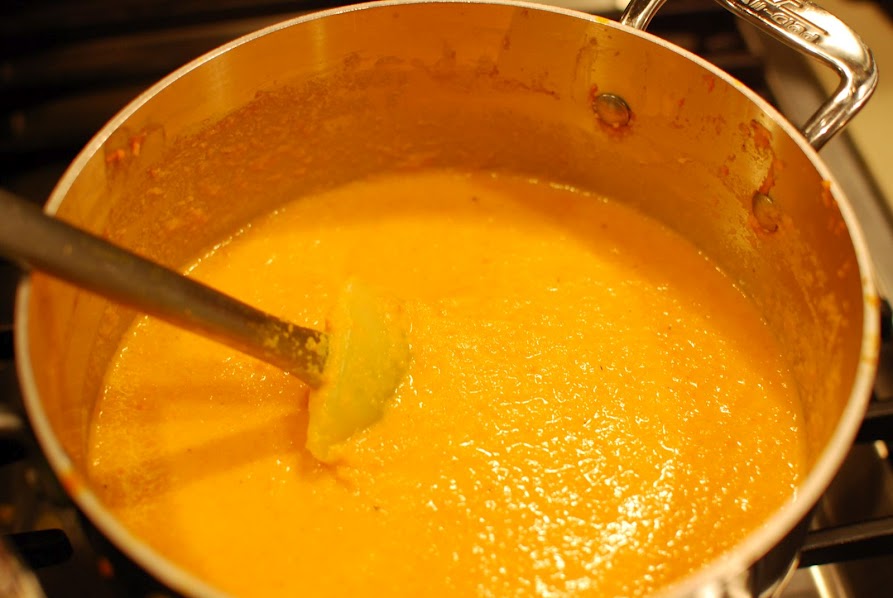
made by Emily I am not a huge carrot fan, but I was looking for something to do with a ton of carrots leftover from a batch of baby food for my 5 month old. I found this idea from an old, old cookbook that I had dusted off from college days (which is funny, because who cooks in college, besides boiling water for Ramen noodles?). Anyway, Matt called this "20/20 soup"; because it's pretty much all carrots. I, however, like to think of it as "complexion soup" : ) Somehow it's a really good and light, summery soup for dinner, or a tasty starter. It's VERY easy too.
You'll Need:
1/2 cup olive oil
2 tsp honey
3 tsp ground cumin
3 tsp coriander seeds
2 cinnamon sticks
1 tsp ground sea salt
Ground black pepper
3 lbs carrots, peeled and cut into even chunks about 1-1 1/2" long
3 cups chicken stock
3 1/2 oz heavy cream
3/4 cup sour cream, for garnish
A few sprigs of cilantro leaves, for garnish
To Make:
Preheat the oven to 400' F. Combine oil, honey, cumin, coriander, cinnamon sticks, 1 tsp sea salt and lots of ground pepper in a roasting pan. Add the chunks of carrot and mix well to coat all pieces of carrot. Roast for 1 hour until carrot is tender (toss the carrots once after 30 minutes or so).
Transfer half the carrot chunks (minus the coriander seeds and cinnamon sticks), 1 1/2 cups of chicken stock, and 1 cup of water to a food processor or blender and blend until completely smooth.
To get the carrots into the blender without the coriander seeds and cinnamon sticks, just use your fingers and brush them off. It's pretty easy. But you don't want the seeds or cinnamon in the blender because it doesn't ground up very well and then you'll have to pick them out of the soup as you eat (I did this the first time I made it and it got a little tedious).
Transfer the pureed carrot mixture to a soup pot and put on Medium heat. Then repeat pureeing the remainder of the roasted carrots, another 1 1/2 c. chicken stock and another 1 c. water. Add this to soup pot too. Simmer this for about 10 minutes. Add the cream and season with salt & pepper as needed.
Garnish with 1/4 tsp sour cream and a little cilantro sprig.
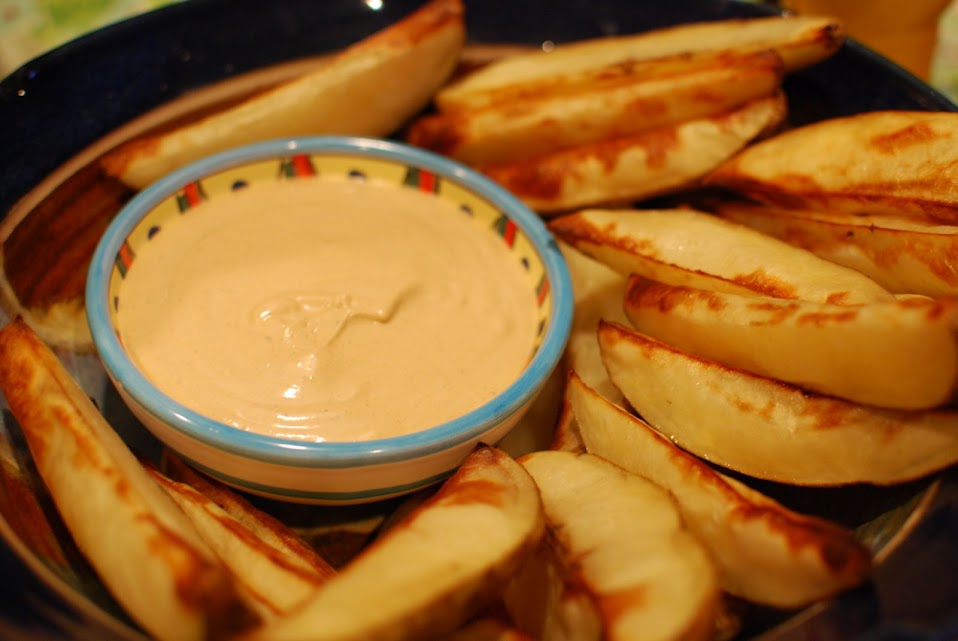
By Miranda Seriously, this has such good flavor and is such a crowd pleaser. Great as an appetizer or hors d'oeuvre and people always ask for the recipe when I make this. I got the original recipe from a tapas cookbook that calls for double this amount of garlic - but I find one HEAD of garlic is plenty!
You will need:
3 lbs potatoes, unpeeled and cut into wedges (about 6-8 wedges per potato depending on size)
2 Tbsp olive oil
2 tsp salt
1 whole head/bulb of garlic
1/2 cup of sour cream
1/2 cup of mayo
1 Tbsp paprika
S+P to taste
The dip tastes great if made ahead of time so flavors can blend together. Make it about an hour or so before serving and refrigerate.
First, roast the garlic. Pre-heat the oven to 400F. Cut the whole bulb of garlic in half so that when cut open you see the middle of each clove. Place face up on a roasting sheet and drizzle with some olive oil. Roast in oven at 400F for about 20 minutes, or until nicely browned.
Remove the cloves from their skins; they should slide out pretty easily. Place garlic cloves, sour cream, mayo and paprika in food processor and process until smooth. Season with salt and pepper and transfer dip to a bowl, cover with plastic wrap and refrigerate until ready to serve.
Then make your potatoes:
Place potato wedges in a roasting pan. Drizzle with the olive oil and sprinkle with salt. Toss to coat. Spread potatoes into a single layer. Roast in oven at 400F for about an hour or until tender in the middle, but golden and crispy on the outside. I find it helps to toss them halfway thru by using a thin metal spatula to get under them (they will stick to the pan a little).
Serve the warm potato wedges with chilled garlic dip. MMMM!!!
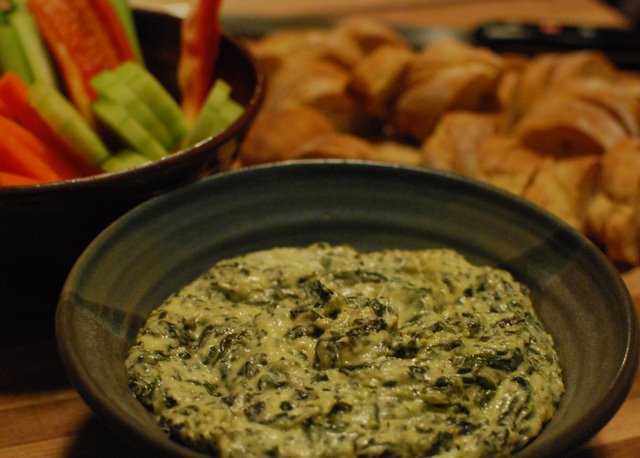
By Miranda This has become a favorite of mine to bring to parties or for when people come over. It's a great finger-food and I thought it would be good to post around the Superbowl! It can be made ahead of time and refrigerated until baking time.
You will need:
4 oz cream cheese, softened (1/2 block)
1/3 cup mayo (or just a hefty spoonful - or yogurt for a healthier option)
1 15 oz can of artichoke hearts
10 oz spinach, chopped (frozen should be thawed, fresh should be steamed; both should be squeezed so most of water is out)
1 cup shredded mozzarella cheese
1/2 cup parmesean cheese
1 garlic clove
Preheat oven to 400 degrees F. Puree artichoke hearts in a blender or food processor or just chop finely. Add garlic to this too or just mince it. Then add all ingredients together in a bowl and stir well until combined. Season to taste with s+p. Spread in an 8x8 baking pan or crock and bake for about 20-30 minutes or until starting to brown on top and its bubbling. Serve with baguette slices, pita chips or corn chips.
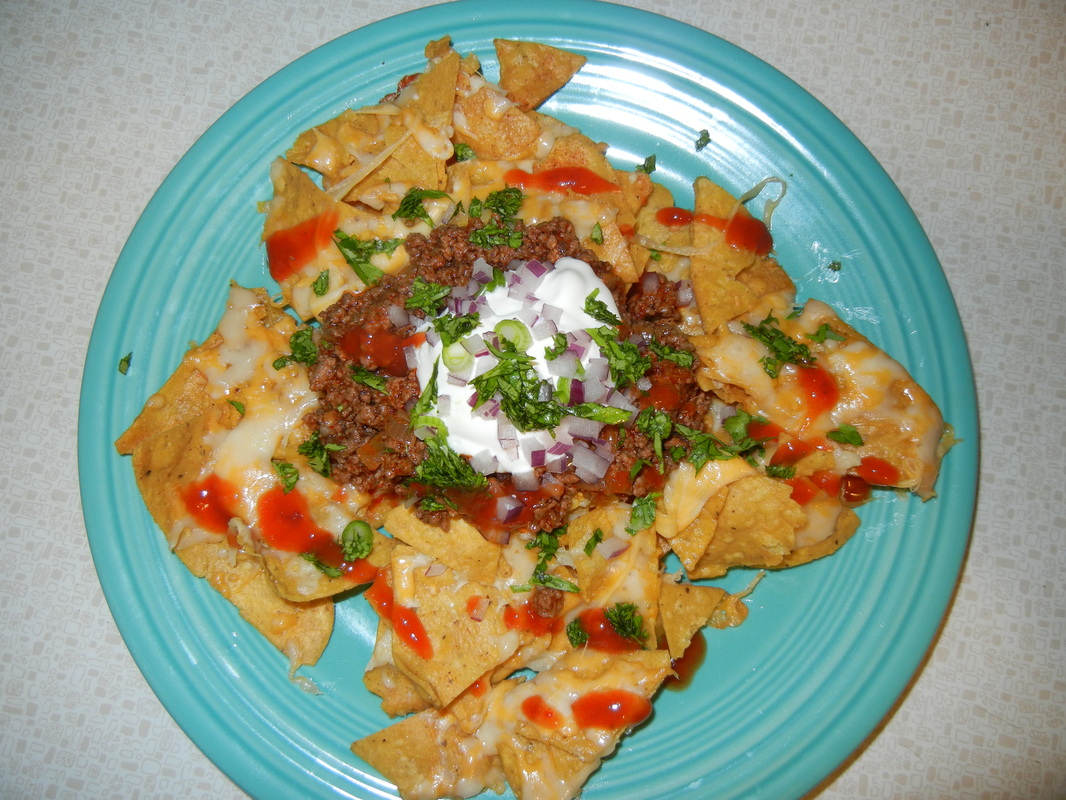
By Rachel I never knew there was anything better than taco meat seasoned with a Taco Bell or Old El Paso seasoning packet....until I met my friend Laura, and she introduced me to the best taco meat EVER! Now I don't think I will ever go back to plain old seasoning packets - unless I am in major pinch. This recipe makes allllllll the difference when making a plate of nachos. You will not regret the extra prep time! Here is what you will need for the taco meat:
2 teaspoons vegetable oil or corn oil
1 small onion , chopped small (about 2/3 cup)
3 medium cloves garlic , minced or pressed through garlic press (about 1 tablespoon)
2 tablespoons chili powder
1 teaspoon ground cumin
1 teaspoon ground coriander
1/ 2 teaspoon dried oregano
1/4 teaspoon cayenne pepper
Salt
1 pound 90% lean ground beef, or leaner
1 cup tomato sauce
1/ 2 cup low-sodium chicken broth
1 teaspoon brown sugar
2 teaspoons vinegar (preferably cider vinegar)
Ground black pepper
Optional other ingredients (if making nachos):
Tortilla chips
Cheese (good quality cheeses always taste better and produces less oil)
Pickled/preserved jalapenos
Sour cream
Onions (I used red and scallions)
Cilantro, chopped
Hot sauce
Directions:
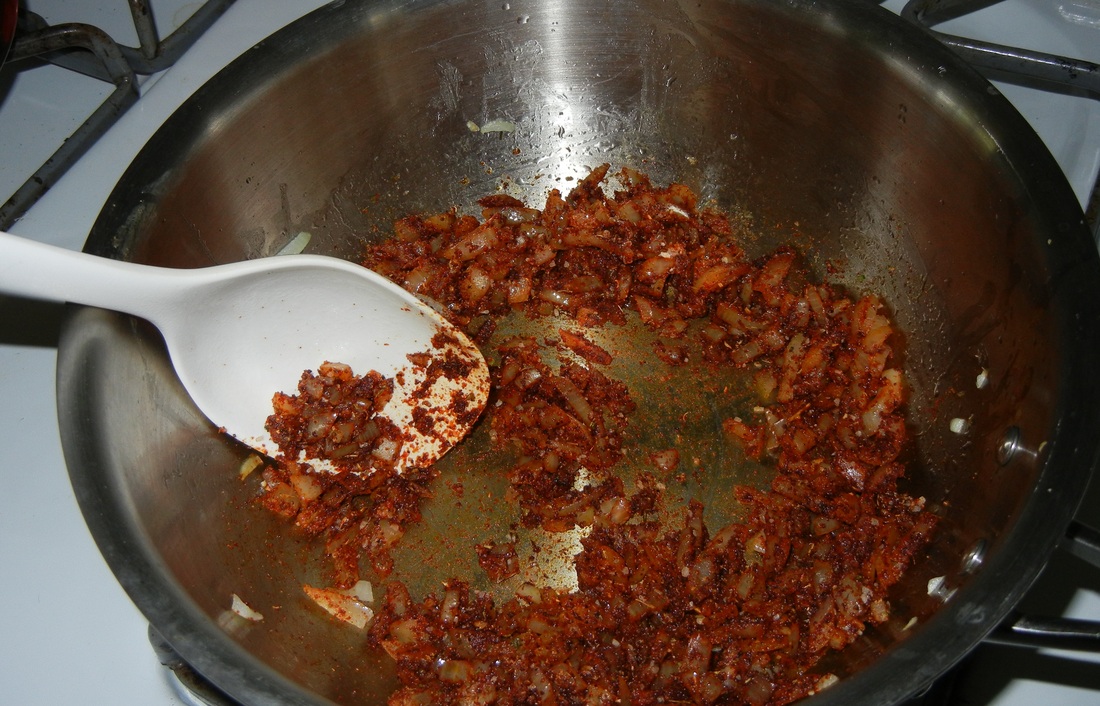
Heat oil in medium skillet over medium heat until hot and shimmering but not smoking, about 2 minutes; add onion and cook, stirring occasionally, until softened, about 4 minutes.
Add garlic, spices, and 1/2 teaspoon salt; cook, stirring constantly, until fragrant, about 1 minute. Add ground beef and cook, breaking meat up with wooden spoon and scraping pan bottom to prevent scorching, until beef is no longer pink, about 5 minutes.
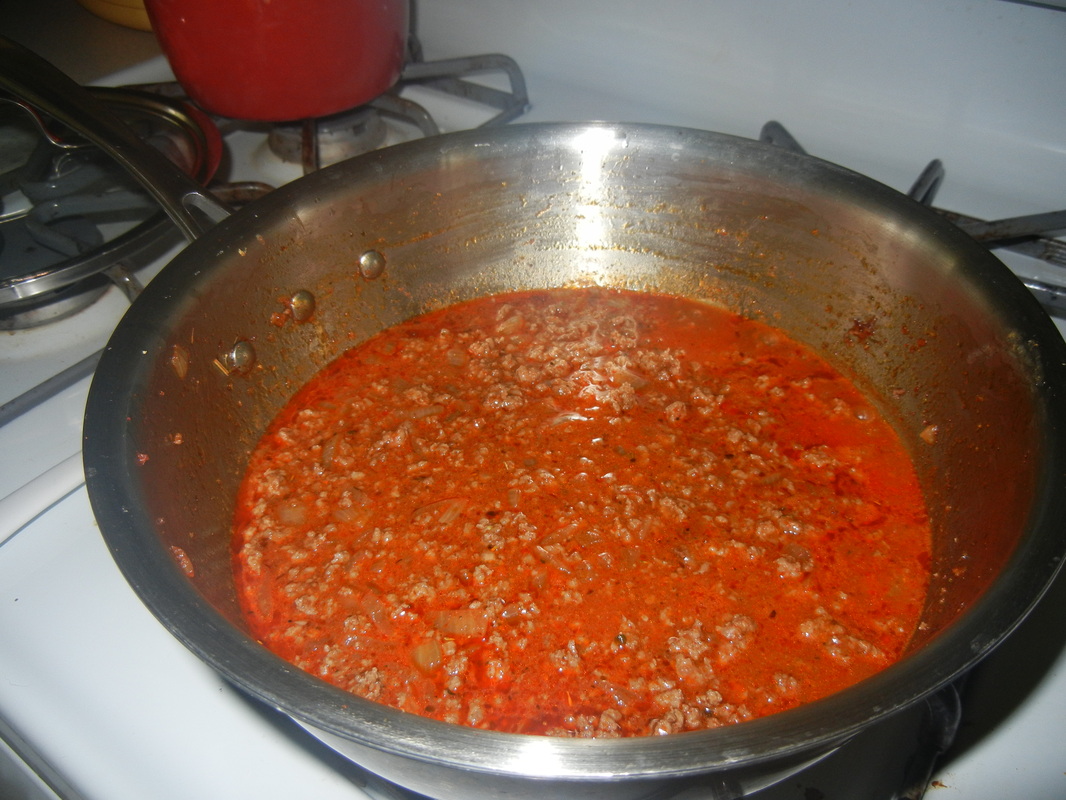
Add tomato sauce, chicken broth, brown sugar, and vinegar; bring to simmer. Reduce heat to medium-low and simmer, uncovered, stirring frequently and breaking meat up so that no chunks remain, until liquid has reduced and thickened (mixture should not be completely dry), about 10 minutes. Adjust seasonings with salt and pepper.
After your taco meat is done cooking, let it sit while you prepare the rest of your nachos (or tacos, burritos, etc). This time I made nachos, so I layered my favorite tortilla chips (Ann Arbor Tortilla Company chips are the BEST!) on a baking dish, shredded good quality sharp cheddar and Monterey jack cheese on top and cooked them until the cheese was melted (just a few minutes so you don't burn the chips). Then I topped them with taco meat, jalapenos, sour cream, onions, cilantro, and hot sauce.
Enjoy!
Note: Using lean, higher percentage beef is important because you don't drain the meat after cooking it, which means all the fat that comes out from cooking goes in your mouth...I mean, this TASTES good, but is pretty nasty and unhealthy!
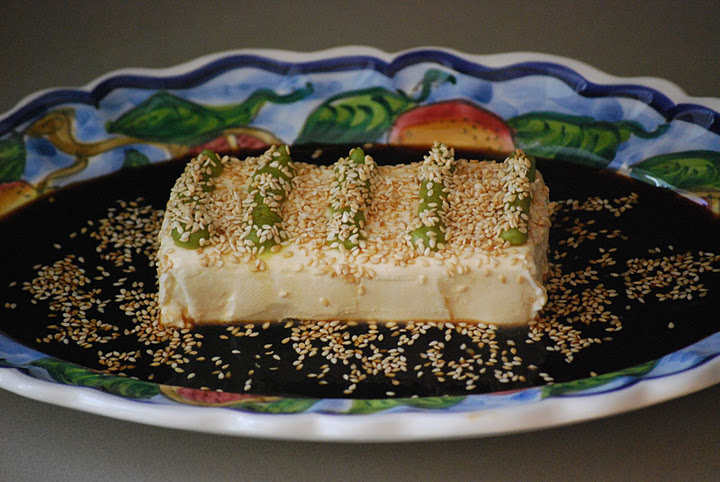
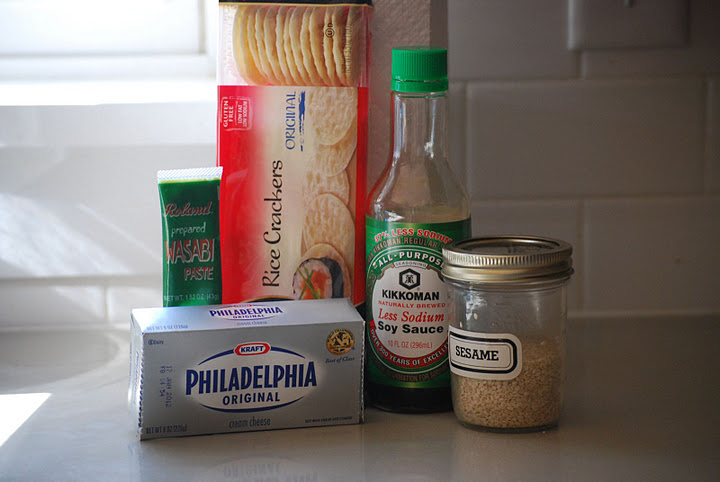
By Emily Another Easy Appetizer - it requires about 5 minutes prep time! This is one I've had at my mother-in-law's as well as at a few other get-together's, and I always like it, so here's the "recipe" combining a few different versions of this simple appetizer.
Feeds 2-4 unless you have other appetizers
You'll Need:
1 8oz pkg of Cream Cheese
1/2 c. Soy Sauce (maybe more depending on your bowl size) - I used Kikkoman Lite
1 pkg of Rice Crackers (not rice cakes!)
prepared Wasabi (this comes in a tube or maybe you have some packets in the fridge from your last sushi take-out)
2 tsp Sesame Seeds
To Make:
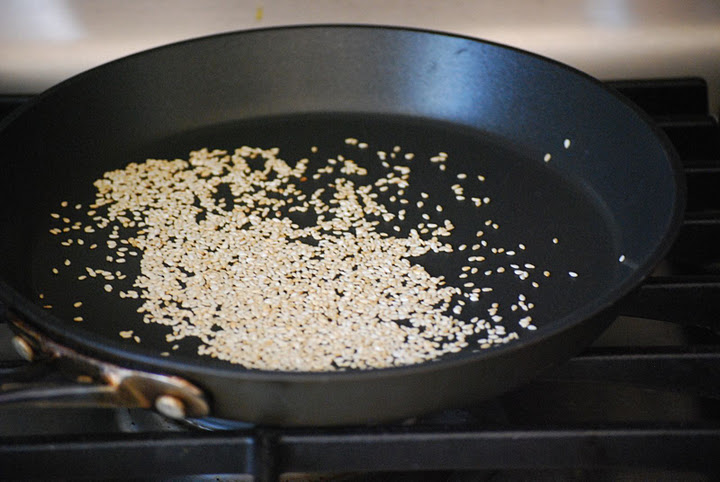
Toast the sesame seeds in a frying pan on medium heat for about 2-3 minutes until they are slightly browned and toasty looking. Set aside to cool.
Unwrap cream cheese and set the block of cream cheese on a decorative plate (NOT a flat plate, because you are going to "float" the cream cheese in a pool of soy sauce). Arrange the wasabi on top of the cream cheese, and use a desired amount. I used about 2 tsp worth. You can get creative with your design! Pour soy sauce over the cream cheese until about 1/2 way up the sides of your cream cheese block. Sprinkle toasted sesame seeds over block of cream cheese. Cover and fridge until ready to use. Serve with rice crackers. The Kikkoman website has a version of this posted as well.
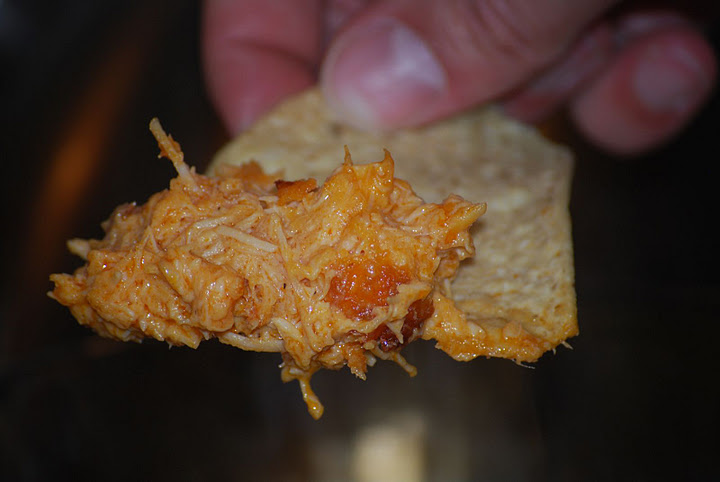
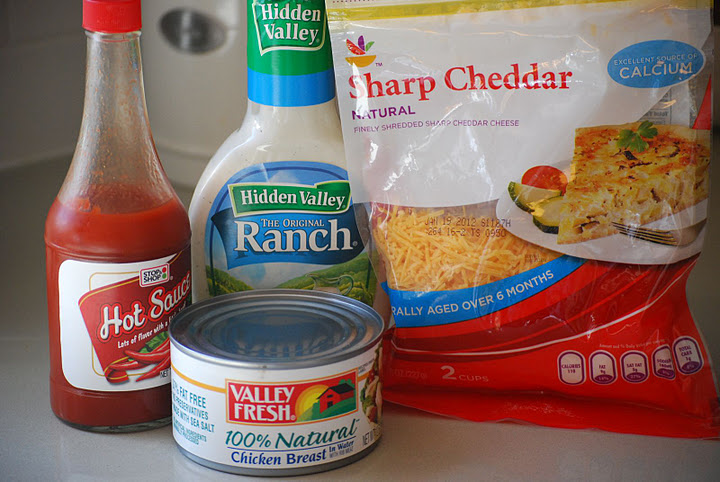
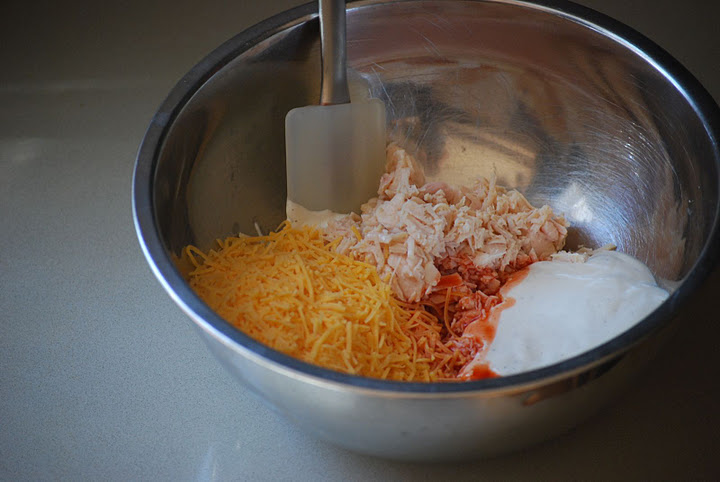
By Emily A friend verbally told me how to make this the other night at a girls-only "Passion Party." Being in my 3rd trimester of pregnancy, the only passion I was feeling that night was towards food. This was so tasty and it's really so quick and easy! Serves 2-4 if this is the only appetizer you have out
You'll Need:
1 12.5 oz can of Chicken Breast in water, OR you can use fresh chicken that is boiled until very tender and shredded apart
3/4 c. Sharp Cheddar (grated)
1/2 c. Ranch Dressing (I used Hidden Valley Ranch)
3 TB Hot Wing Sauce (generic brand is fine, mild or hot as you like)
1 bag of tortilla chips or pita chips for dipping
Preheat oven to 375'
Open the can of chicken and drain the juice (as if you are preparing tuna fish salad). Put the meat in a medium sized bowl and break up the lumps with a fork.
Add the rest of the ingredients to this bowl - except the chips - and incorporate thoroughly.
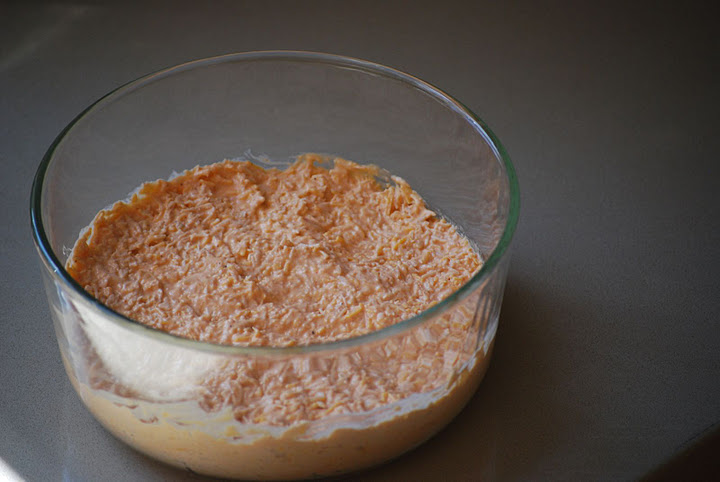
Put the mixture into a ceramic ovenproof bowl or you can use a glass pie dish.
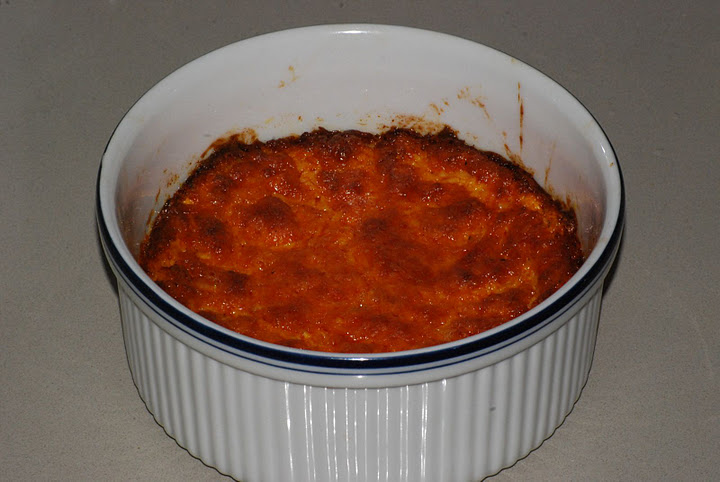
Cook in the oven for approx 35 minutes, until top is lightly browned and bubbling.
Let stand for a few minutes since it will be very hot. Serve immediately with chips.
Notes: If you need to prepare ahead, cover with plastic wrap and fridge before cooking and serving. Then add about 10 minutes to the cooking time since it will be cold. You can make it a day in advance but cook it just before serving.
|