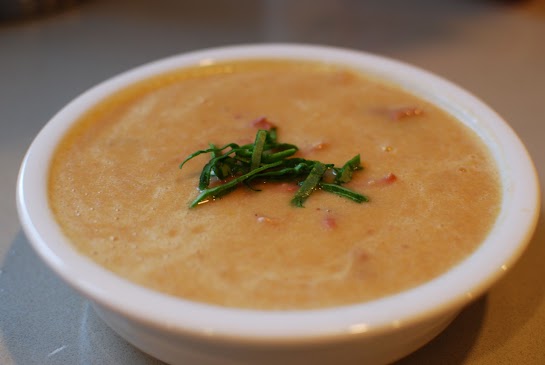
made by Emily I recently came up with this recipe after making a Honey Baked ham. After a few days of eating the ham leftovers, finally I got around to making soup from the ham bone (to freeze because we were sick of ham!). I read a few recipes and got the idea to puree the soup which added a fancy twist. It was so good, it never made it to the freezer!
You'll Need:
1 Tbs olive oil
1 medium yellow onion, chopped
1 garlic clove, whole
3 sizable celery stalks chopped (with leaves if they have them)
3 large carrots, peeled and chopped
1-2 lb ham bone (not sure what mine weighed but it was what was left over from a Honey Baked ham, and it still had some meat on it)
1 bay leaf
About 10 cups of water
3 15 1/2 oz cans of light colored beans (I used "pinto", "white" & "navy" beans)
To Make:
In a large soup pot, cook veggies (onion, garlic, celery & carrots) in olive oil on medium for about 5 minutes, stirring occasionally.
Add 10 cups of water, ham bone with all the meat on it, beans and bay leaf. The meat will fall off the ham bone after cooking for a while so don't do any trimming yet.
Bring to a boil, then simmer with a lid on for 2 hrs.
Remove ham bone and set aside on a plate to cool.
Meanwhile, let the soup cool a little, then puree in batches using a blender or food processor. This gets a little messy but it's worth it. Return pureed soup to the pot.
Remove meat from the ham bone now that it's slightly cooled enough to handle, chop and return the meat to the pot of soup. Discard the bone and any fatty pieces.
Season to taste with sea salt and fresh ground black pepper. Serve with warm rolls, crusty french bread, or you can garnish with homemade croutons*.
*To make homemade croutons, chop french bread up into small cubes (about 1/2-1" diameter) and toss with olive oil, sea salt and fresh ground pepper. Spread all out on a cookie sheet and broil on high for about 5 minutes until they start to brown and toast. Toss the croutons halfway thru broiling so the other sides get a little brown too. Remove and let them cool on a paper towel.
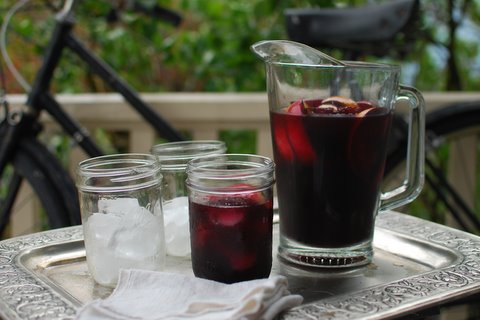
made by Miranda You gotta be careful with this - make sure you have company to share it with because its very easy to refill your glass and refill your glass and refill your glass and then you cant count anymore... Also I should mention ahead of time that this takes a few days to make. It tastes ok when just made, but a few days in the fridge makes a huge difference in the flavor.
You'll need:2 oranges
2 apples
1/3 cup water
1/3 cup granulated sugar
2 Tbs lime juice
1/2 tsp cinnamon
2 bottles red wine (750 ml each)
2 Tbs brandy (optional)
Tonic or seltzer (optional)
To make:
Heat the water in the microwave and add the sugar - stir to dissolve then set aside to cool.
Cut up the 2 apples and 1 of the oranges and drop them in a 1/2 gallon size (atleast) container. Squeeze the remaining orange over the fruit, and also add the lime juice,
cinnamon, brandy and wine.
Add in about 1/3 cup of the sugar/water mixture, stir then taste. Add more of the sugar water (called simple syrup) to taste. The mixture will sweeten over the next 2 days so make it just a tad less sweet than how you'd want it. You could also save the rest of the simple syrup in the fridge to add later.
Cover your container and place in fridge to let the sangria "brew" for at least 2 days before serving. Can serve straight up or topped with a little seltzer or tonic. Don't forget to eat your fruit too!
Note: you can experiment with different red wines, but I like to add one darker wine like a burgundy and then one sweeter wine so i don't have to add as much sugar.
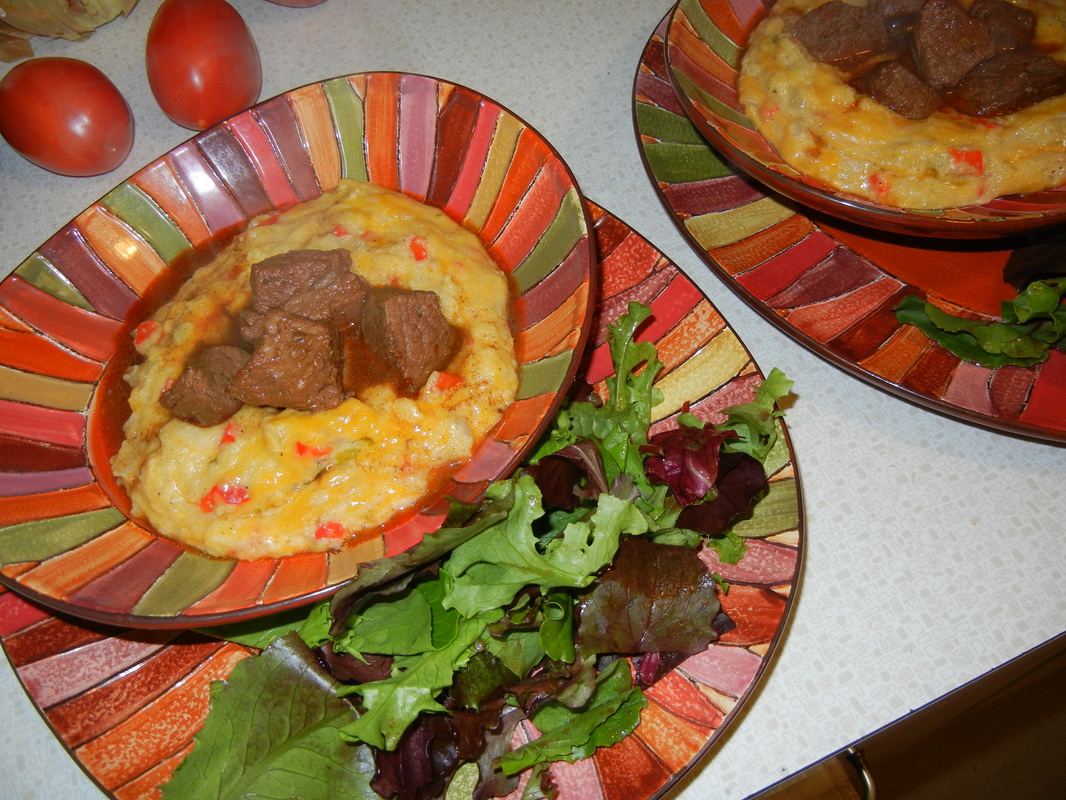
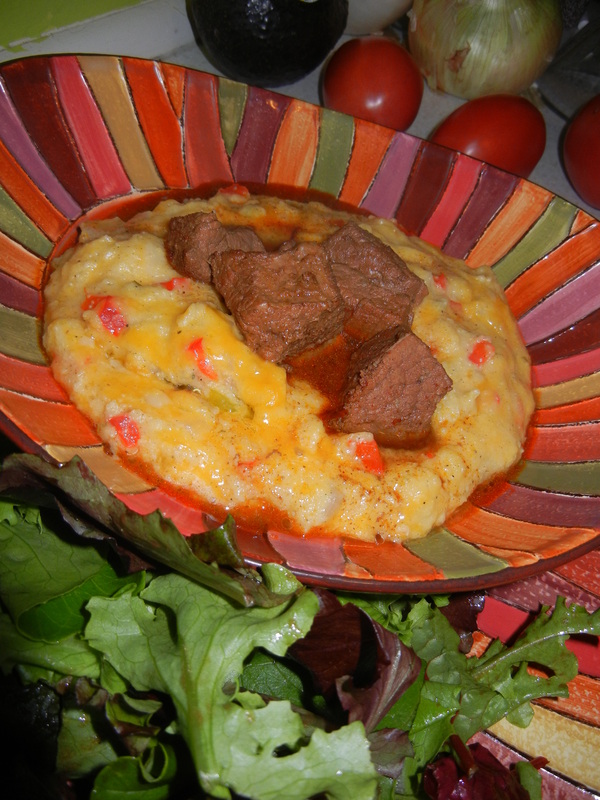
made by Rachel I don't know how to make this recipe sound as delicious as it is...so you are just going to have to take my word for it! The super tender meat has a slightly smokey flavor and pretty much melts in your mouth and the polenta is creamy and full of flavor from the cheese and peppers. I hope that description is enough to make you go try it yourself! For the meat, you will need:
2 Tbs canola oil
2 Tbs butter
Approx 2 cups of stew beef, cut into chunks (you can definitely used more, there will be enough liquid for about 4 cups of beef if needed)
2-3 tsp chiles in Adobo sauce (you can add more if you like but 3 tsp make sit pretty spicy!)
4 cups beef broth
3 small/med garlic cloves, pressed or minced
1 Tbs cumin
1 Tbs chili powder
For the polenta, you will need:
1/2 of a large onion, diced
1/2 of a large red pepper, diced
1 Tbs butter
1 Tbs oil
1 1/2 cups water
2 cups milk (I used 1%)
2 tsp minced/pressed garlic
1 bay leaf
2 tsp thyme
1 1/2 tsp salt
1/2 tsp pepper
1 cup polenta (I used cornmeal)
4 Tbs unsalted butter
1/2-1 cup sharp cheddar, grated
2 Tbs fresh Parmesan, grated
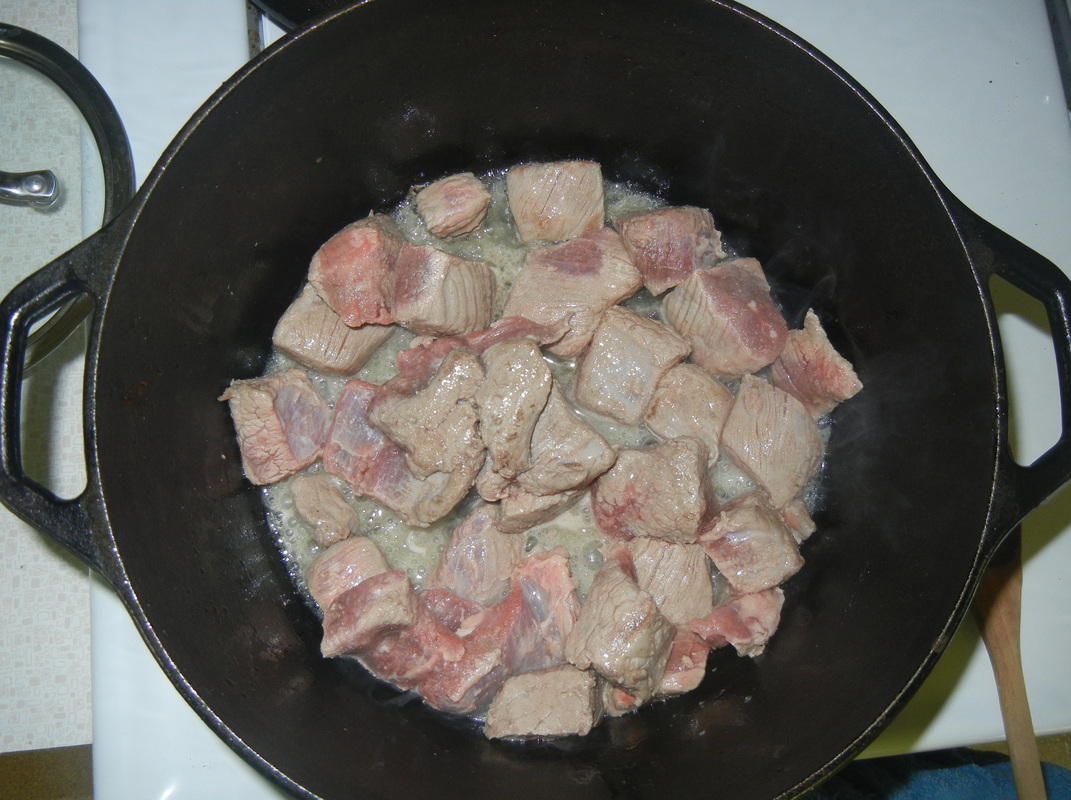
Start your meat about 4 hours before you want to eat...
Heat oil and butter in a dutch oven/cast iron pot over high heat. Throw in stew meat and brown for 1 minute, then add chiles in adobo, beef broth, garlic, cumin, and chili powder. Stir, then bring to a boil. Reduce the heat to low, then cover and simmer for 3-4 hours, or until the meat is fall-apart tender. I did not have to add any extra water/broth, but you might need to. Just keep an eye on the meat and if the liquid is getting low, add a little more to the pot.
In the last hour of cooking time, make your polenta...
Heat the oil and butter in a large sauce pan. Add onion and red pepper and cook for a few minutes, or until onions start to get translucent. Add the garlic and stir for another minute. Then add the water, milk, bay leaf, thyme, salt and pepper. Bring to a boil and then slowly add the cornmeal/polenta, stirring constantly. Reduce the heat to low and simmer, stirring often until the polenta thickens, about 25 minutes.
Add the butter to the polenta and stir until melted. Add the cheddar and Parmesan, stirring well.
To serve, scoop a generous helping of polenta and make a crater in the middle. Add a few chunks of beef and a splash of the cooking liquid.
Since this is a kind of "heavy" meal, I served it with mixed greens to make me feel better! It was DELICIOUS and gave us lots of leftovers for lunch through the rest of the week!
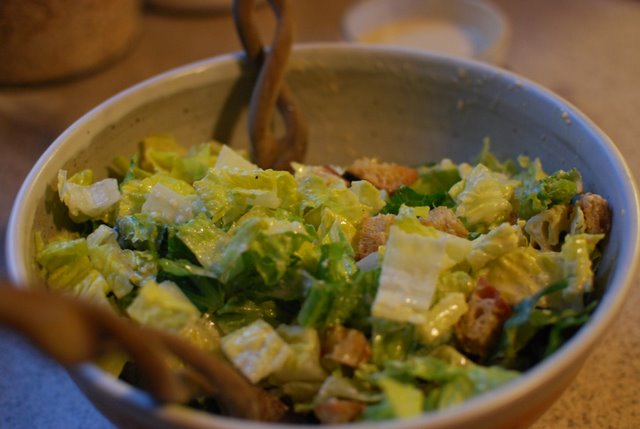
made by Miranda I've been into making my own salad dressings lately. We had a random few summery days here in NH in March so we made grilled chicken Caesar salads!
(Makes about 1/2 cup)
You will need: Scant 1/3 cup mayo 2 Tbsp lemon juice 1 Tbsp olive oil 2 tsp cider vinegar 1 tsp worcestershire sauce 1 tsp fish sauce 1 tsp dijon mustard 1 garlic clove 1 cup shredded parmesean cheese * pepper+ salt to taste *I shred my own parm, so 1 cup might be different than if you use pre-grated instead. Blend all ingredients in a blender or food processor. Makes about 1/2 cup.
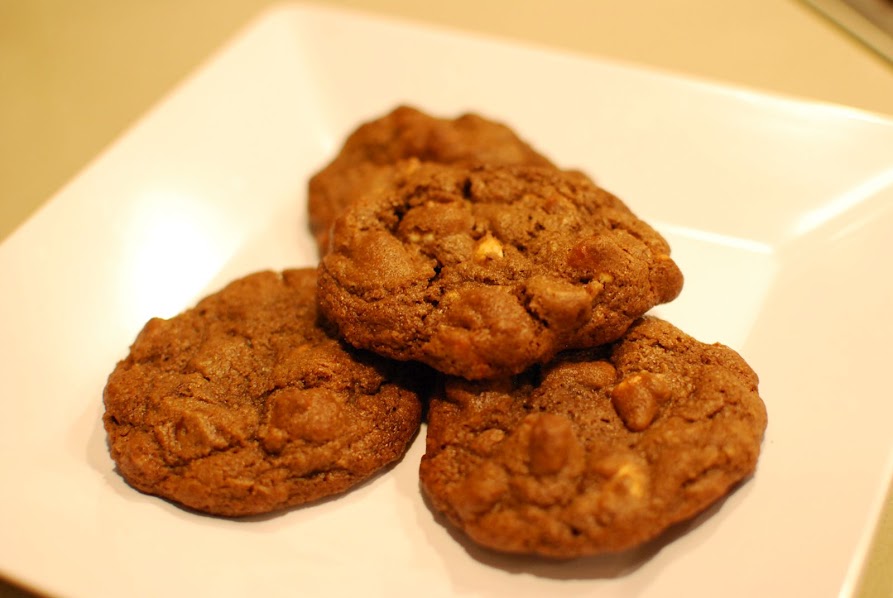
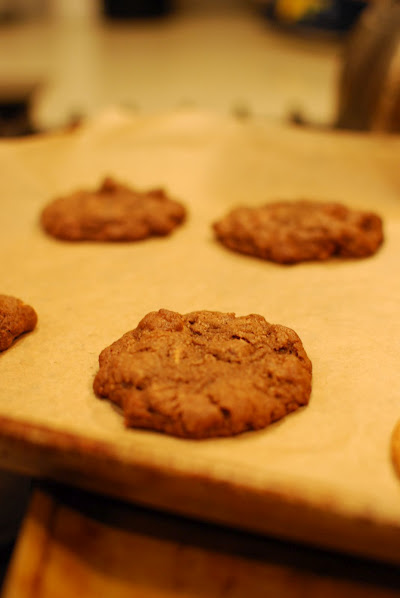
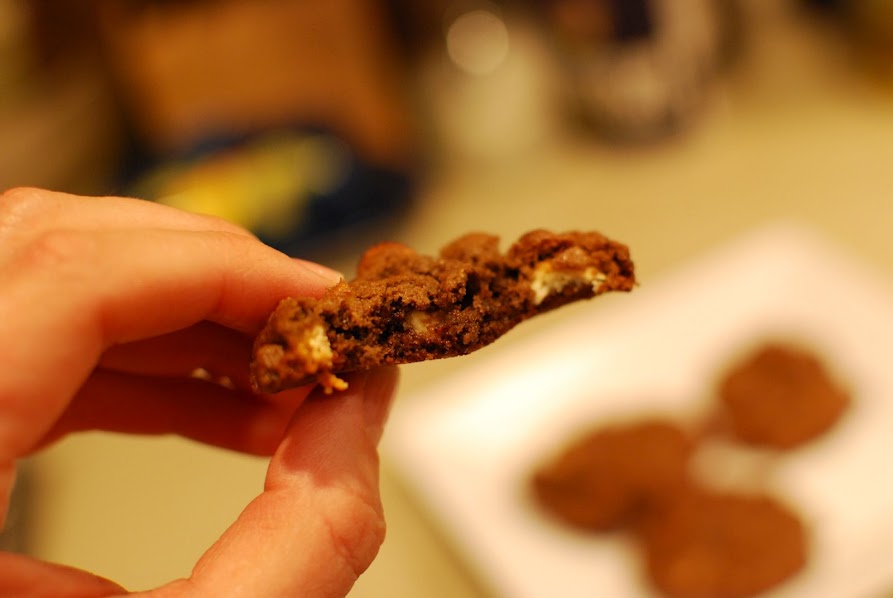
made by Emily Mandy sent me this recipe a while ago and it called for margarine instead of butter, and regular chocolate chips instead of white. I like the recipe with these modifications because it reminds me of the cookies I loved from the deli I worked in growing up. Don't forget to grease the cookie sheet, it makes a big difference!
You'll Need:
1/2 cup butter, softened
1/2 cup white sugar
1/2 cup brown sugar
1 egg
1 tsp vanilla extract
1 cup all-purpose flour
1/2 tsp baking soda
1/2 tsp salt
2 T + 2 tsp unsweetened Hershey's cocoa powder
3/4 cup semisweet chocolate chips
3/4 cup white chocolate chips
To Make:
Preheat to 375F
Grease cookie sheets.
In mixing bowl or kitchen-aid mixer, cream together butter and sugars until smooth. Beat the egg in, then add vanilla. In separate bowl, sift together flour, baking soda, salt and cocoa powder. Add to the butter/sugar/egg/vanilla mixture and mix well. Stir in the chocolate and white chocolate chips slowly until just incorporated. Make tablespoonfuls of dough (about 1 1/2" diameter) and place on greased cookie sheet, and bake in oven for about 10 minutes. Allow to cool for a few minutes on the cookie sheet before removing to wire racks to cool.
Suggestion: bake what you need immediately (need, ha!). Fridge the rest of the dough balls on a separate cookie sheet until firm, then transfer to a ziplock bag and freeze until you are ready for more cookies. You can't beat fresh baked cookies!
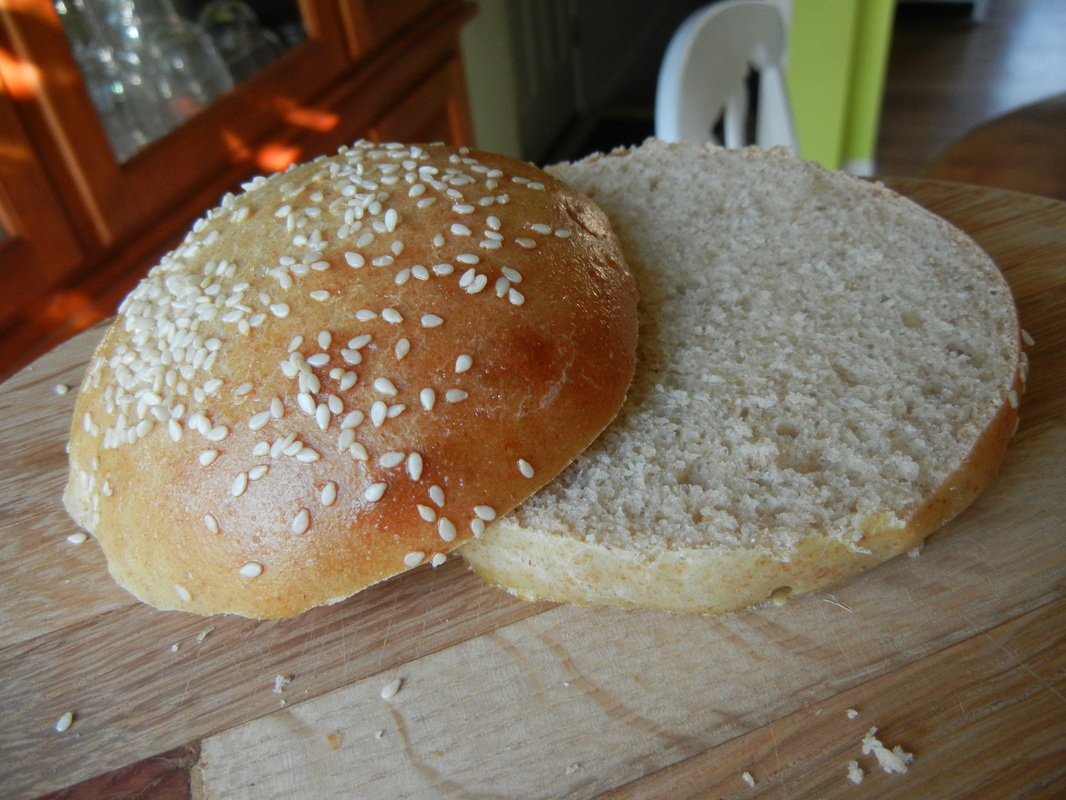
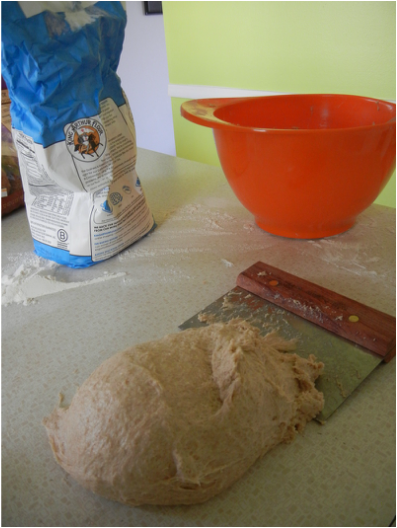
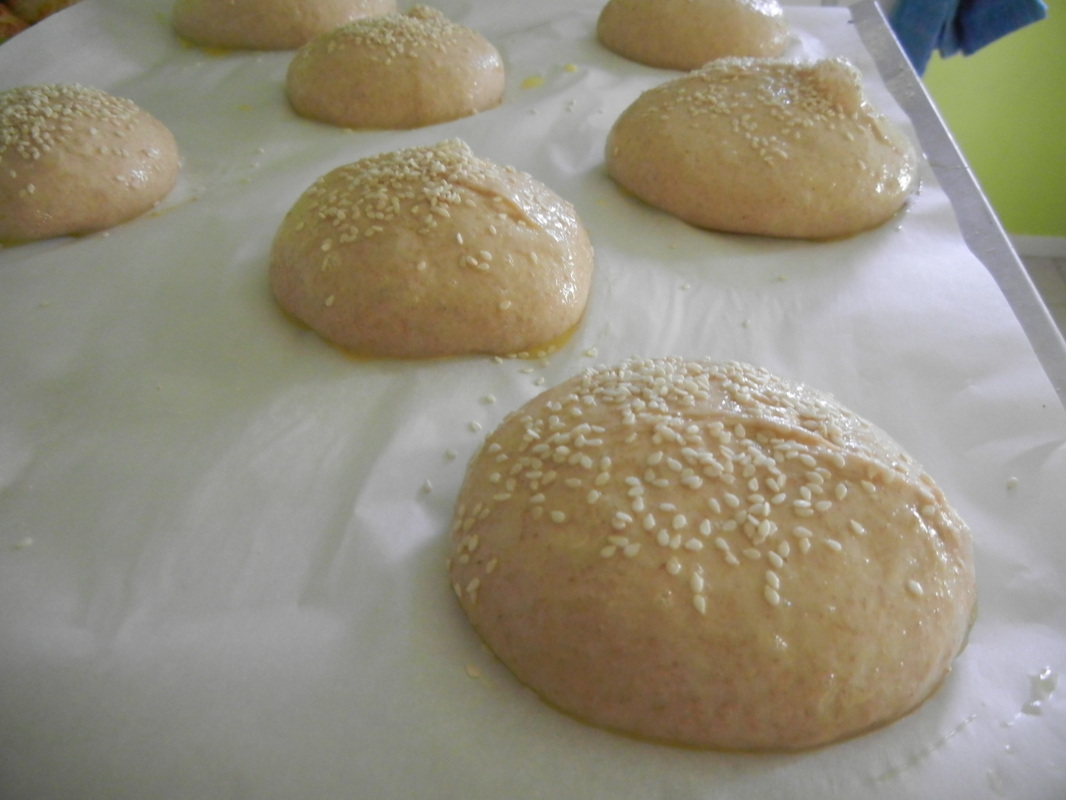
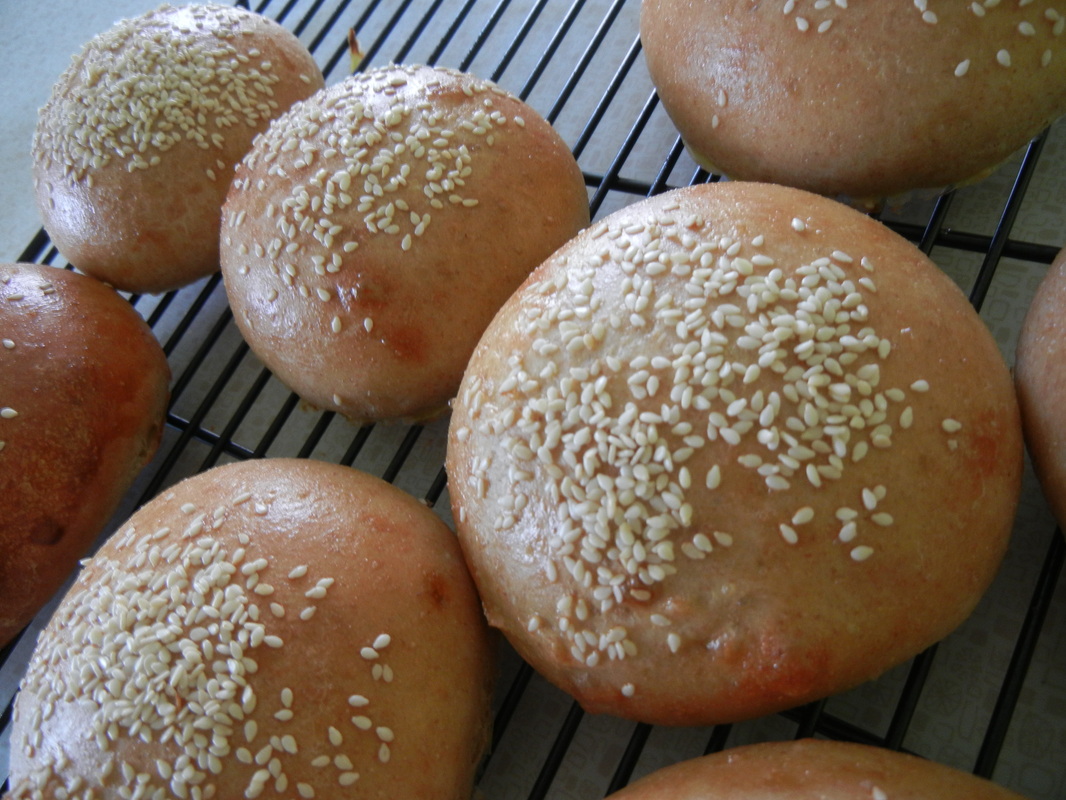
made by Rachel I have been wanting to make my owns buns...hamburger buns that is...for some time now but I am usually pretty intimidated by breads. However, after making a successful pizza dough I thought I would give it a try and they turned out great! This recipe is adapted from Smitten Kitchen. Instead of all white I used some whole wheat flour and I used less sugar because my super talented brother in law said that's what he did - and I pretty much listen to anything he says when it comes to cooking! For 8 good sized buns, you will need: 3 Tbs milk
2 tsp active dry yeast
1 1/2 Tbs sugar
2 large eggs, separated
2 cups white bread flour1 cup whole wheat bread flour
1/3 cup all-purpose flour
1 1/2 teaspoons salt
2 1/2 tablespoons unsalted butter
Handful of sesame seeds
To make: Combine 1 cup warm water with the milk, yeast and sugar and set aside. In a separate bowl, beat one of the eggs.In yet another bowl, mix your flours and salt. Melt the butter and mix into flour with your fingers, creating crumbs. Next pour in the yeast/water mixture and the beaten egg into the flour mixture until a sticky dough forms. Transfer the dough to a lightly floured surface and kneed until tight and elastic - about 10 minutes - hang in there, your arms mayyyy be sore!
Form a tight ball and place in a bowl covered with plastic wrap. Let the dough rise in a warm spot for about 2 hours.
Line a baking sheet with parchment paper and divide dough into 8 equal cuts. Role each piece into a ball and arrange on the baking sheet. Spray a piece of plastic wrap with oil and lightly cover and let the dough rise for 2 more hours.
Fill a baking pan with water and place on the bottom rack in the oven. Pre-heat the oven to 400F. Beat that other egg and brush on the buns then sprinkle with sesame seeds. Bake for about 15 minutes or until the tops are golden brown. Depending on your oven you may need to rotate the pan of halfway during baking so they all cook evenly.
Transfer the buns to a wire rack to cool and enjoy with your favorite burger or sandwich!
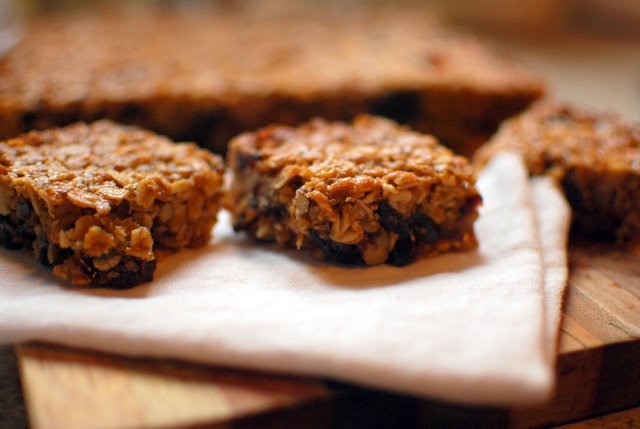
made by Miranda My friend Karen made these for me for Christmas and I really really really love them. The original recipe is from Smitten Kitchen (a favorite blog of ours). That recipe has some room for customizing, giving you options for fruit, nut and sweetener additions. I have made them more than a few times now and THIS is my favorite combination. I cut them up into bars and individually wrap them and freeze them- this way I have no excuse to not eat breakfast.
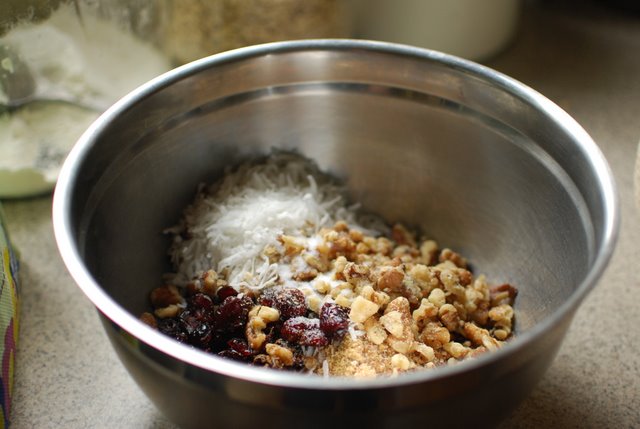
You will need:
1 2/3 cups oats
1/2 cup brown sugar
1/3 cup oat flour (to make this I grind oatmeal in a food processory or krupps coffee grinder)
1/2 tsp salt
1/4 tsp cinnamon
1 cup dried cranberries
1 cup shredded coconut
1/2 cup chopped pecans
1/2 cup chopped walnuts
1/3 cup peanut butter
2 Tbsp coconut oil
1 tsp vanilla
5 Tbsp butter
1/4 cup maple syrup
2 Tbsp corn syrup
1 Tbsp water
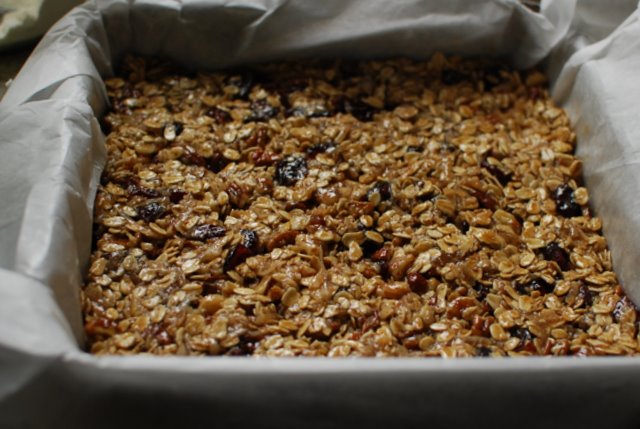
Preheat oven to 350 F. Grease an 8x8 or 9x9 pan and line with parchment (This is for removing and cutting them later). Toss together the dry ingredients in a large bowl.
Put the rest of the ingredients in a microwave safe bowl and heat until butter, pb and coconut oil are melted. Add wet ingredients to dry and stir well to combine. Press firmly into your prepared pan and bake about 40-45 minutes or until the top is nicely browned. Cool completely in pan, then use parchment paper to lift out bar onto cutting board to cool even further. Using a large serated knife and a sawing motion, carefully cut them into bars so they dont crumble. (if you are having trouble, it may be helpful to refridgerate first). Sooooo yummy!
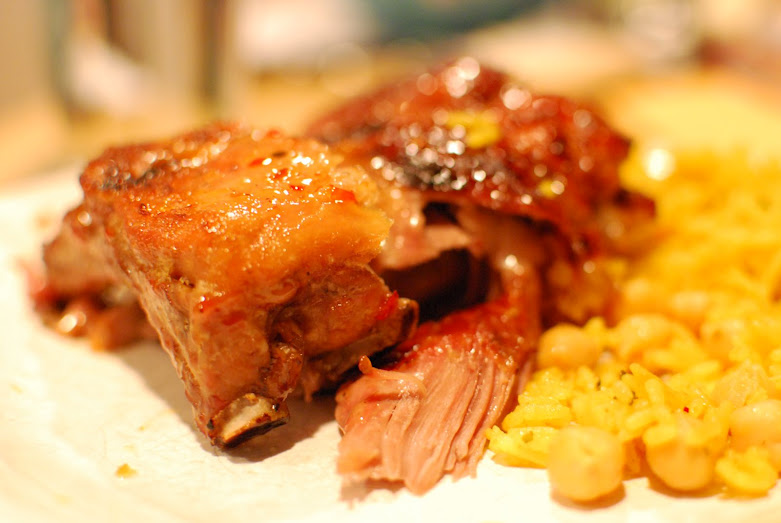
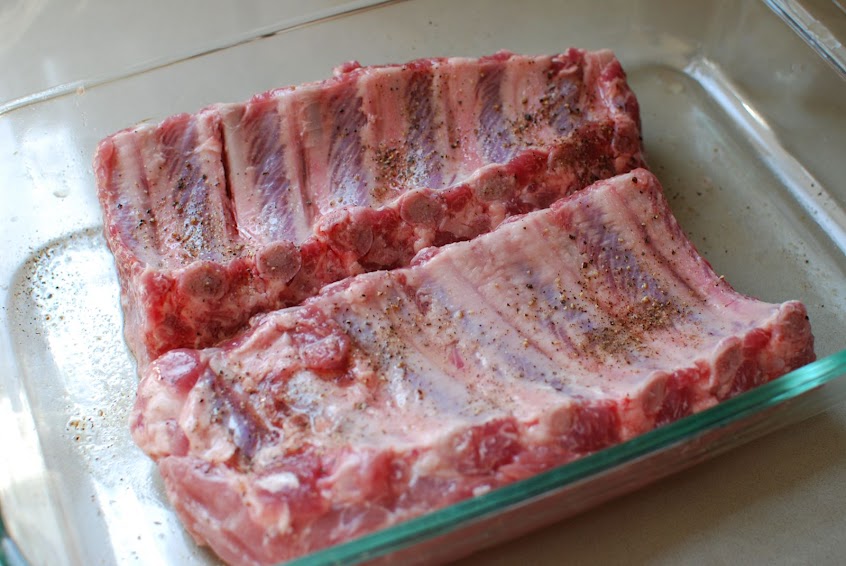
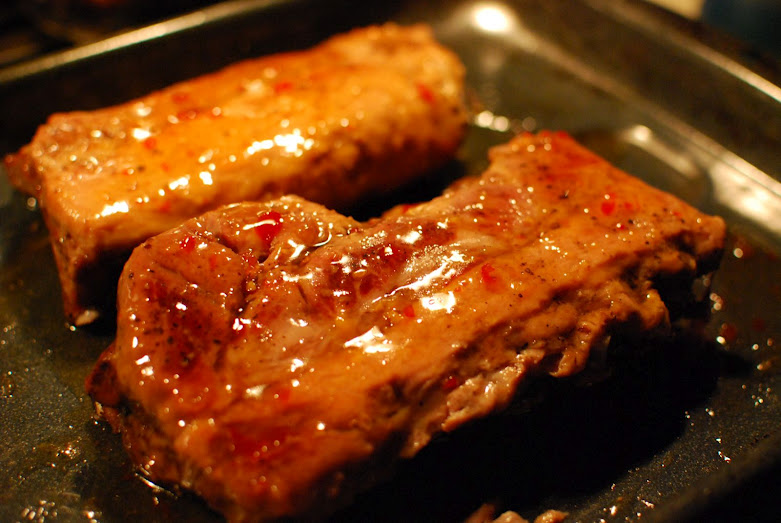
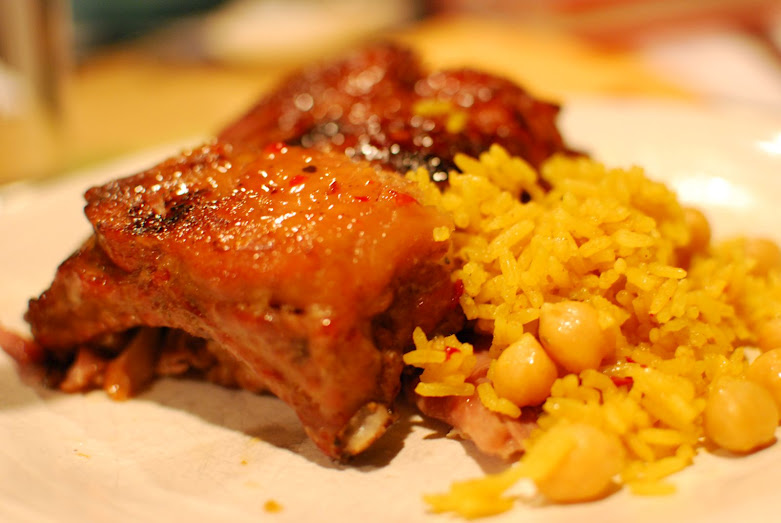
made by Emily If you like tender, fall-off-the-bone ribs, then this is the recipe for you... AND this recipe is so easy! It takes 5 minutes of prep. The only thing is that you need to put it in the oven after lunch in order to have for dinner that night. I found this recipe from a blog called Steamy Kitchen and I make these all the time now.
You'll need:
Baby back ribs (for 2 people, get a rack of ribs around 2-3 lbs, 5-6lbs for 4 people)
Salt & pepper
Bottle of sweet Thai chili sauce (found in ethnic food aisle near soy sauce, etc.)
To Make:
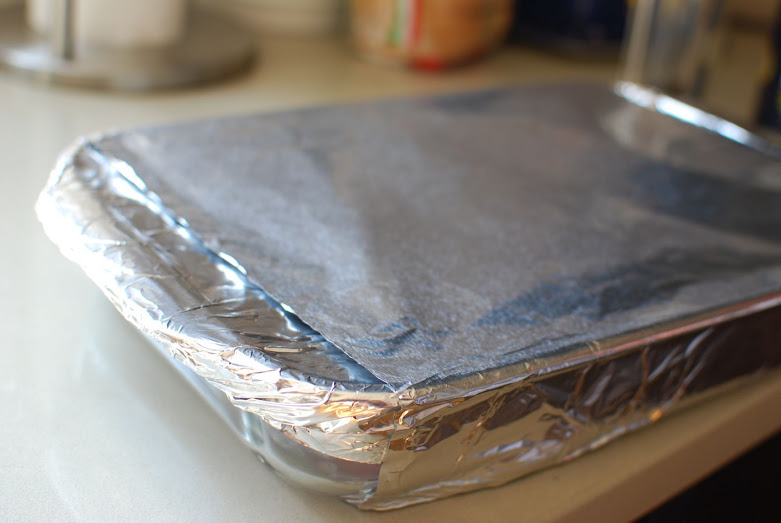
Preheat oven to 275F. Rinse ribs with water and you may cut rack in half so it fits in your dish*. Season both sides with salt and pepper.
Place the ribs in a glass pyrex or roasting pan, cover tightly with foil.
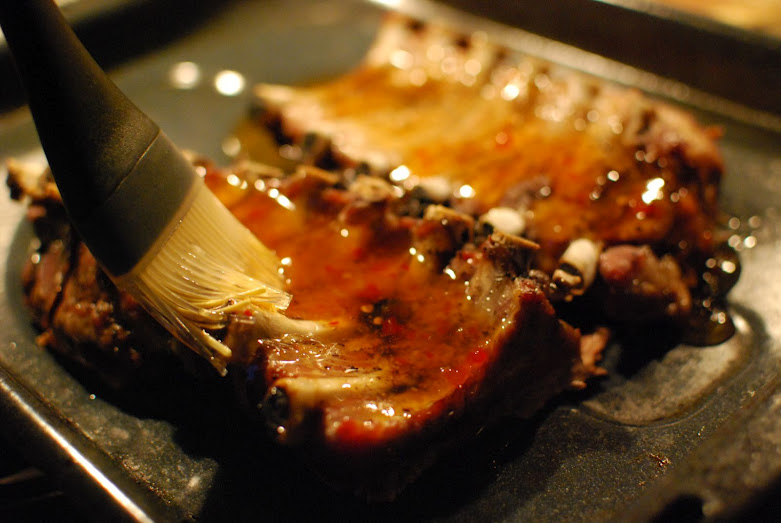
Cook in oven for 4-6 hours. Longer the more tender. Remove from oven and place ribs on a baking sheet. Brush on a LOT of the Thai chili sauce, and both sides.
Place oven rack near the top of the oven and broil the ribs for 3-5 minutes, until the sweet chili sauce begins to caramelize and bubble.
Keep checking so you don't burn the sauce. Serve with rice or veggies and enjoy!! *Note: On the underside of the ribs, remove the thin membrane IF you see this; some have it removed already. It's a thin layer of fat. You can remove it by inserting a butterknife underneath and pull the layer of fatty membrane off the rack of ribs. I didn't remove this and it was fine, but if you remove it, it helps make the ribs more tender. Check out this blog if you want more details on this: http://steamykitchen.com/11036-baby-back-ribs-recipe-fall-off-bone.html
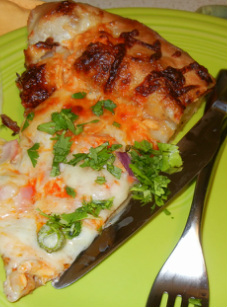
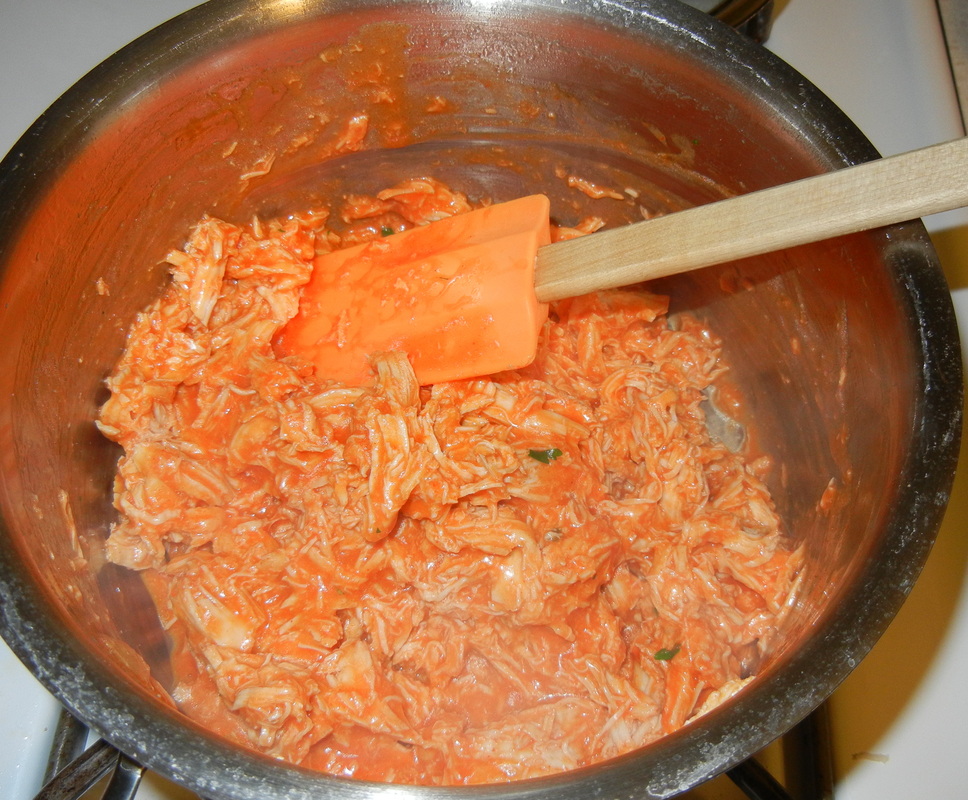
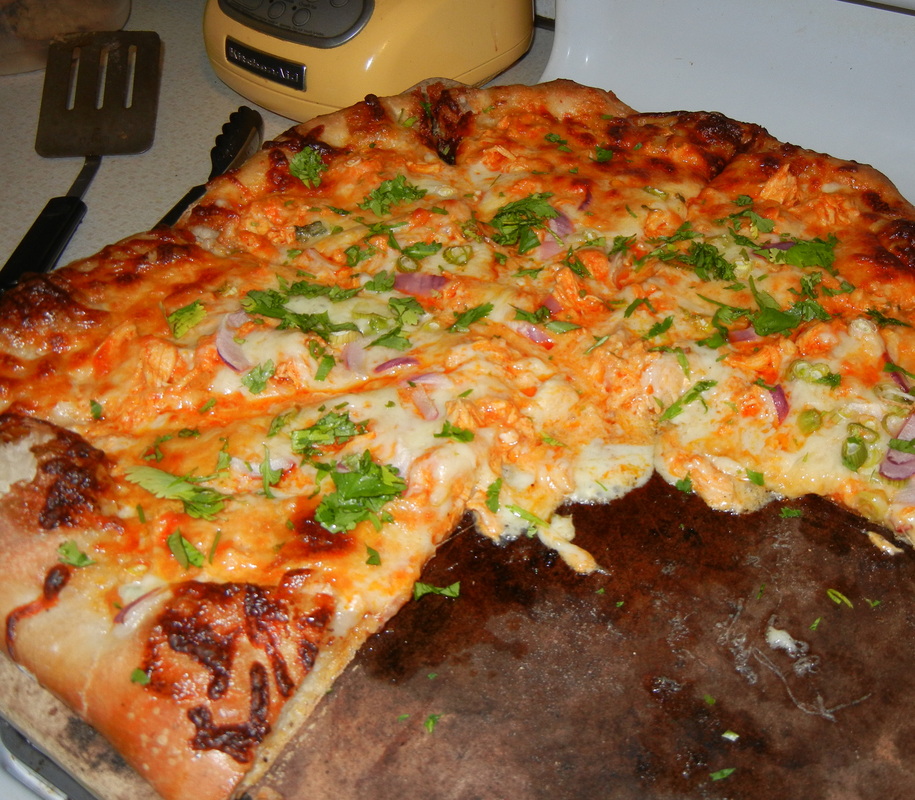
made by Rachel Once a week my husband and I have pizza night, and my latest favorite is Buffalo Chicken with Blue Cheese and cilantro, an idea I got from a friend during our Super Bowl party...the pizza was a pretty huge hit and while it's not healthiest choice, it is great for every once in a while! You will need: Pizza dough (I have been making this recipe lately and LOVE it) Blue cheese dressing (my favorite is Marie's if you can't do homemade) Cilantro, chopped Red onion, diced (as much or as little as you like) Scallions, optional, chopped Chicken, about two cups (I use a rotisserie chicken because I think they have the best flavor, but you can also boil a chicken breast or two, or use canned if you are in a pinch and don't mind canned chicken) Frank's Red Hot Buffalo Sauce (about a half cup, depending on how much chicken you use) 2-3 Tbs of butter Mozzarella cheese (again, up to you how much, I use about a cup and a half) To make: Pre-heat your oven to 500F and put in your pizza stone (if using). I usually let my oven preheat while I prep everything else (chop my onion, cilantro, shred the chicken, etc.) The dough I make says to pre-heat for about an hour before cooking your pizza. All the while your dough should be on the counter rising. In a saucepan, melt your butter and Franks Red hot. Once the butter is all melted, stir in your chicken, and add more Frank's if needed. You want the chicken to be coated but not soupy. Lower the oven to 425 and take out your pizza stone. Now hopefully your pizza dough shaping skills are better than mine because my pizzas are almost never round. They usually end up looking like I didn't try at all and just plopped the dough on the stone...but I really do try! So stretch your dough and make the best circle you can and lay it out on your stone.
Using a spatula, spread a thin, even coat of blue cheese dressing over the dough. I liked to get the dressing even on the crust parts for extra flavor. Now spread your chicken pieces all over, then cheese, then onions. Bake your pizza at 425F until the edges are golden brown (or darker if you like super crunchy pizza crust!). Remove from the oven and keep the pizza on the stone for a few minutes until the cheese sets and it's ready to cut. Sprinkle with chopped cilantro and serve...and do yourself a favor and don't eat the whole pie - you will want to!!
|